1. Getting Started
Signing up
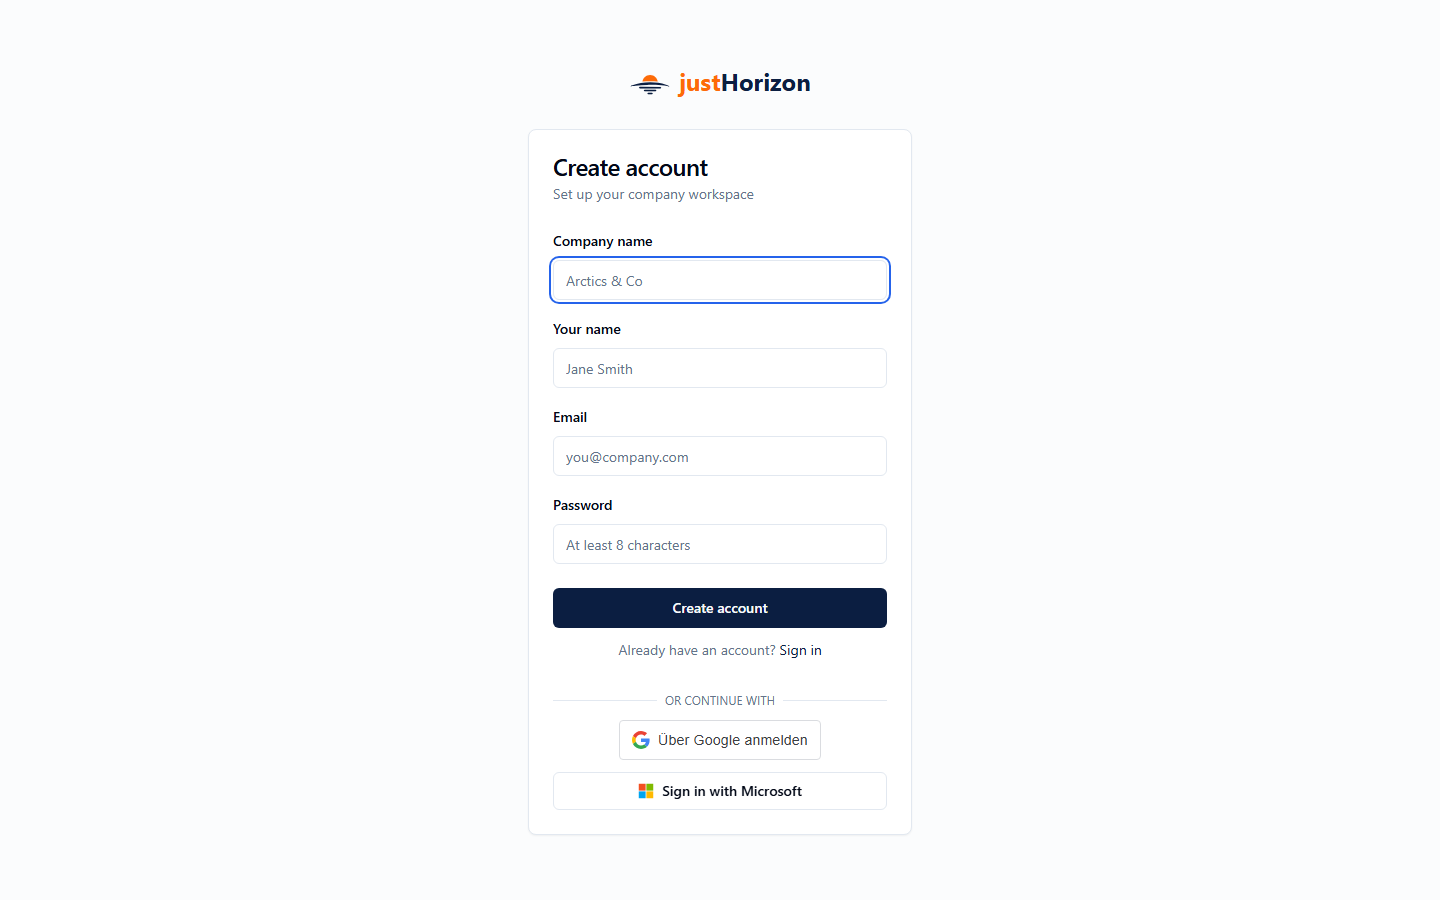
Go to /register and fill in your name, email, password, and company name. This creates your account and a new company workspace.
If you were invited by a team member, use the link in the invitation email — it pre-fills the invite token and joins you to their company automatically.
Sign in with Google or Microsoft — if enabled for your deployment, the corresponding button appears on the login, register, and invite pages. If your email already has an account, the OAuth identity is linked automatically.
Logging in
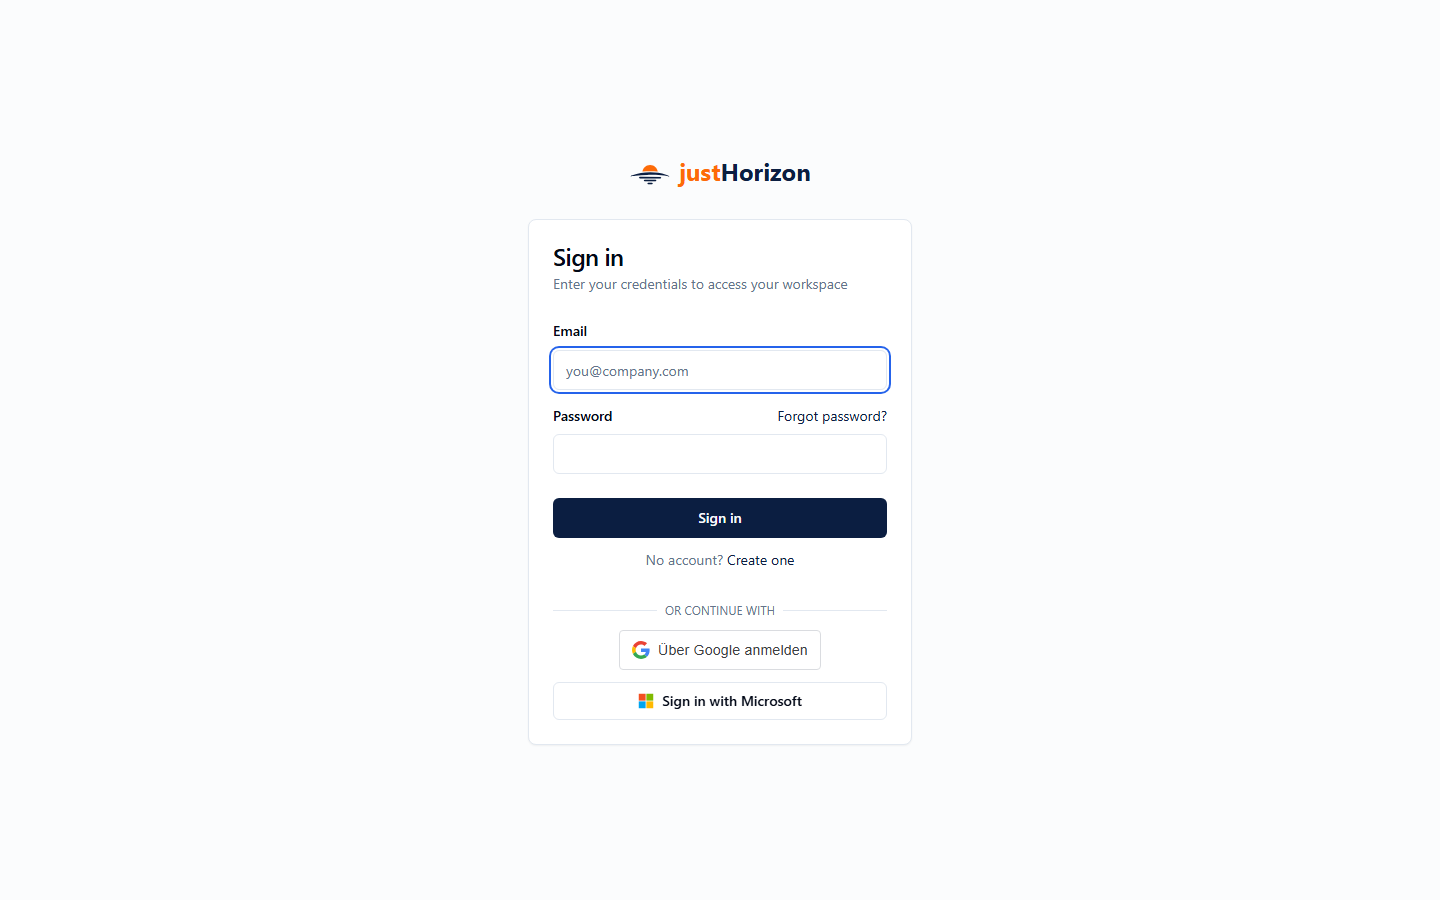
Go to /login. Enter your email and password, or use "Sign in with Google / Microsoft".
Logging out
Use the Sign out button in the sidebar footer. Your session is cleared immediately.
Forgot your password?
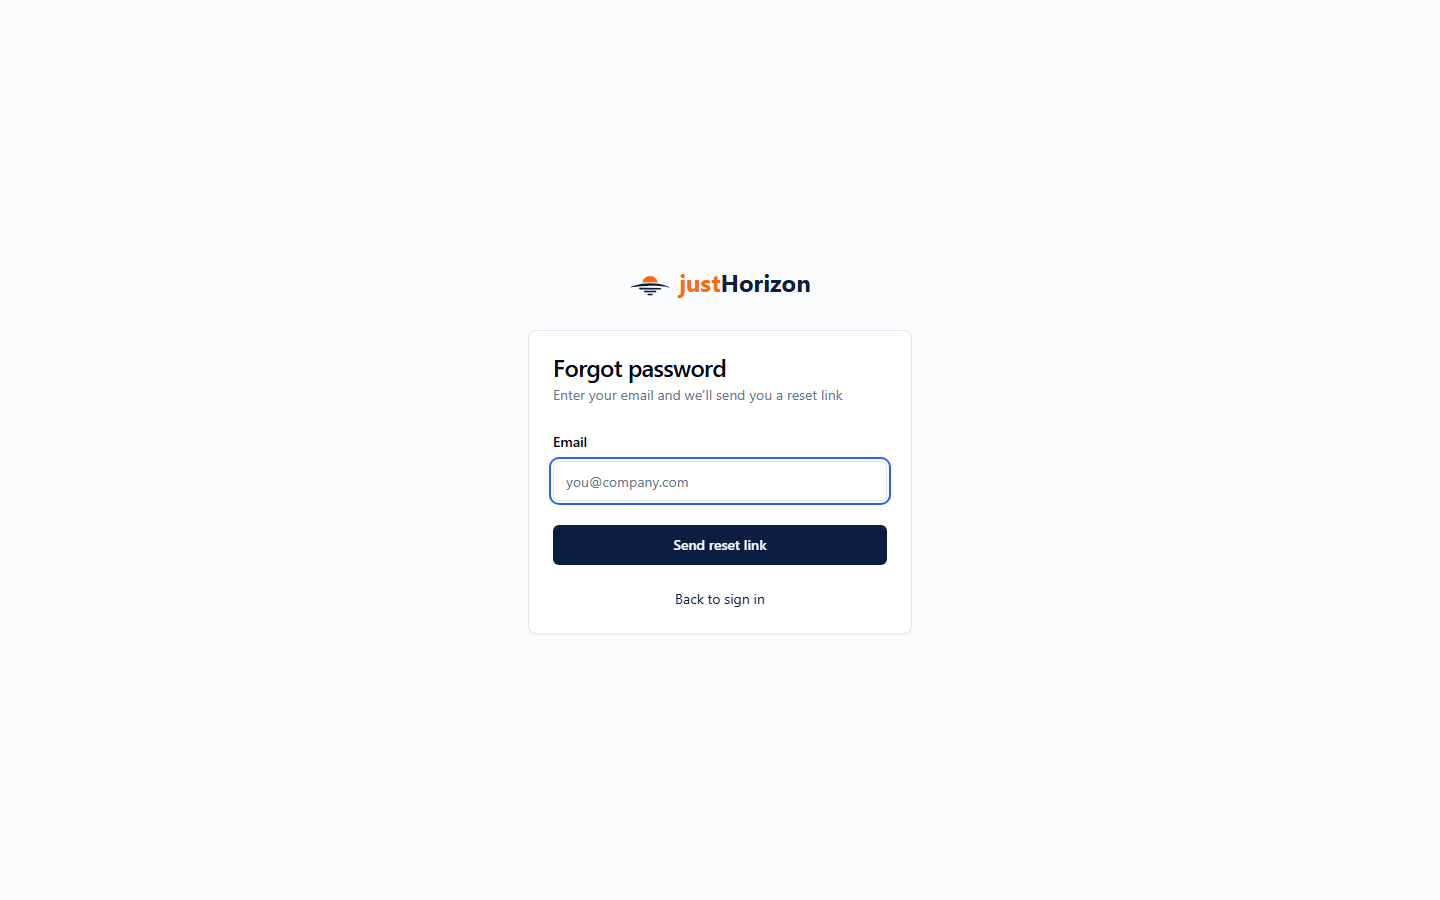
Click Forgot password? on the login page, enter your email, and check your inbox. Click the link in the email — it takes you to a page where you enter and confirm your new password. The reset link expires in 1 hour. If you only have a Google/Microsoft login (no password set), the reset flow sets a password for the first time, giving you an extra login method.
Roles
Every user has a company role (admin or viewer) and optionally a calendar role (admin, editor, or viewer) on each calendar they belong to.
| Role | Who they are |
|---|---|
| Company Admin | Manages the whole company workspace — invites members, edits company name, views audit log, manages all calendars |
| Company Viewer | Standard team member |
| Calendar Admin | Full control over a specific calendar — settings and members |
| Calendar Editor | Can create, edit, and delete events on a specific calendar |
| Calendar Viewer | Can view events on a specific calendar; cannot create or edit |
A Company Admin can act as a calendar admin on any calendar, even ones they are not explicitly a member of.
2. Dashboard
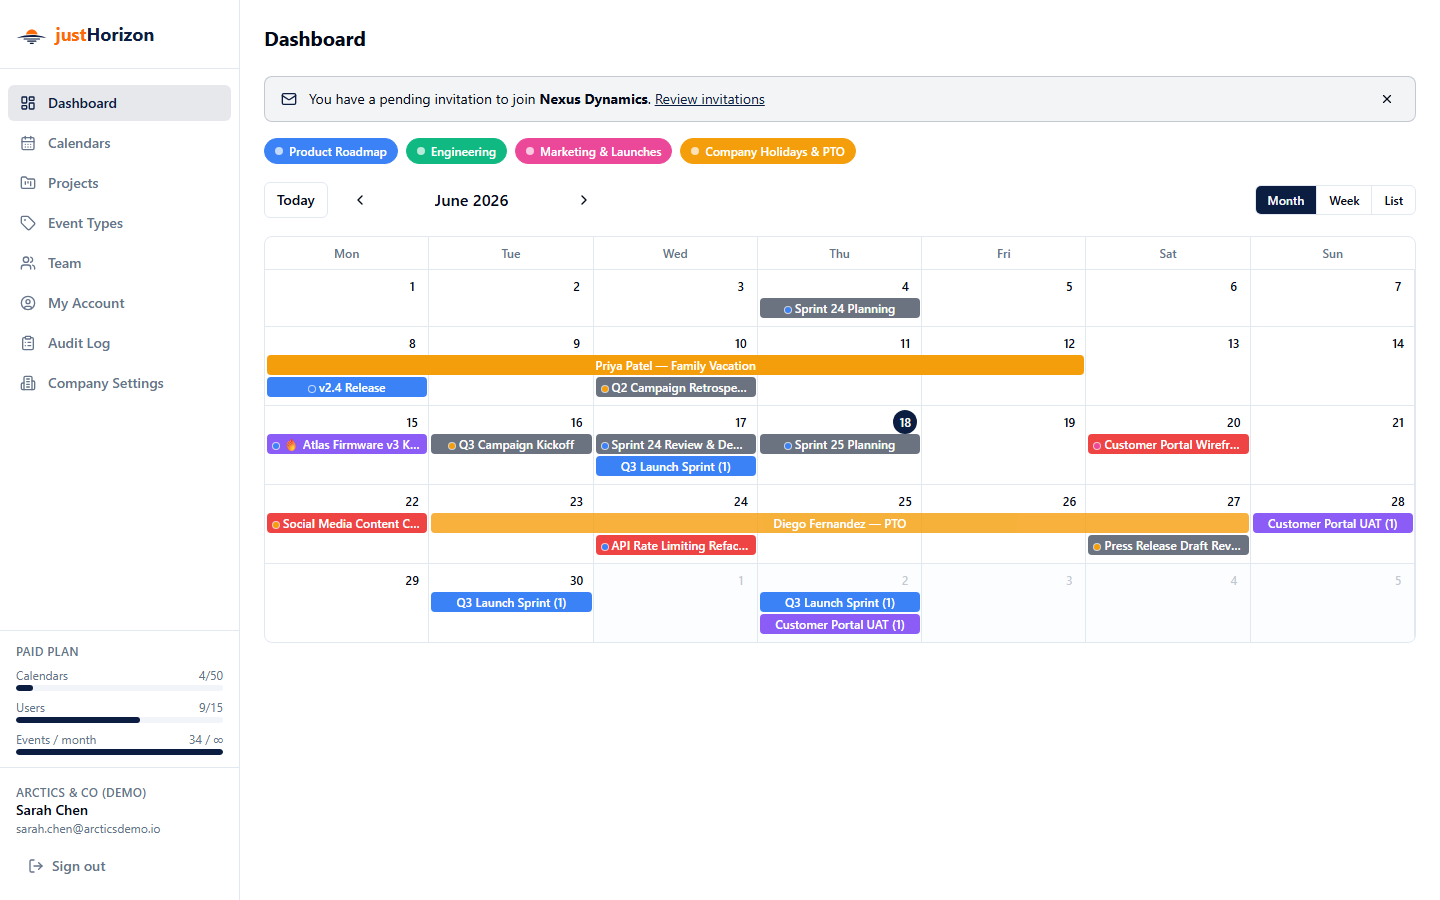
The dashboard (/dashboard) shows a combined calendar view of all your calendars. Switch between Month, Week, and List views using the tabs at the top right. Use Today and the prev/next arrows to navigate.
- Each calendar's events appear in that calendar's color.
- Use the toggle chips at the top to show or hide individual calendars.
- Click any event to open its detail panel.
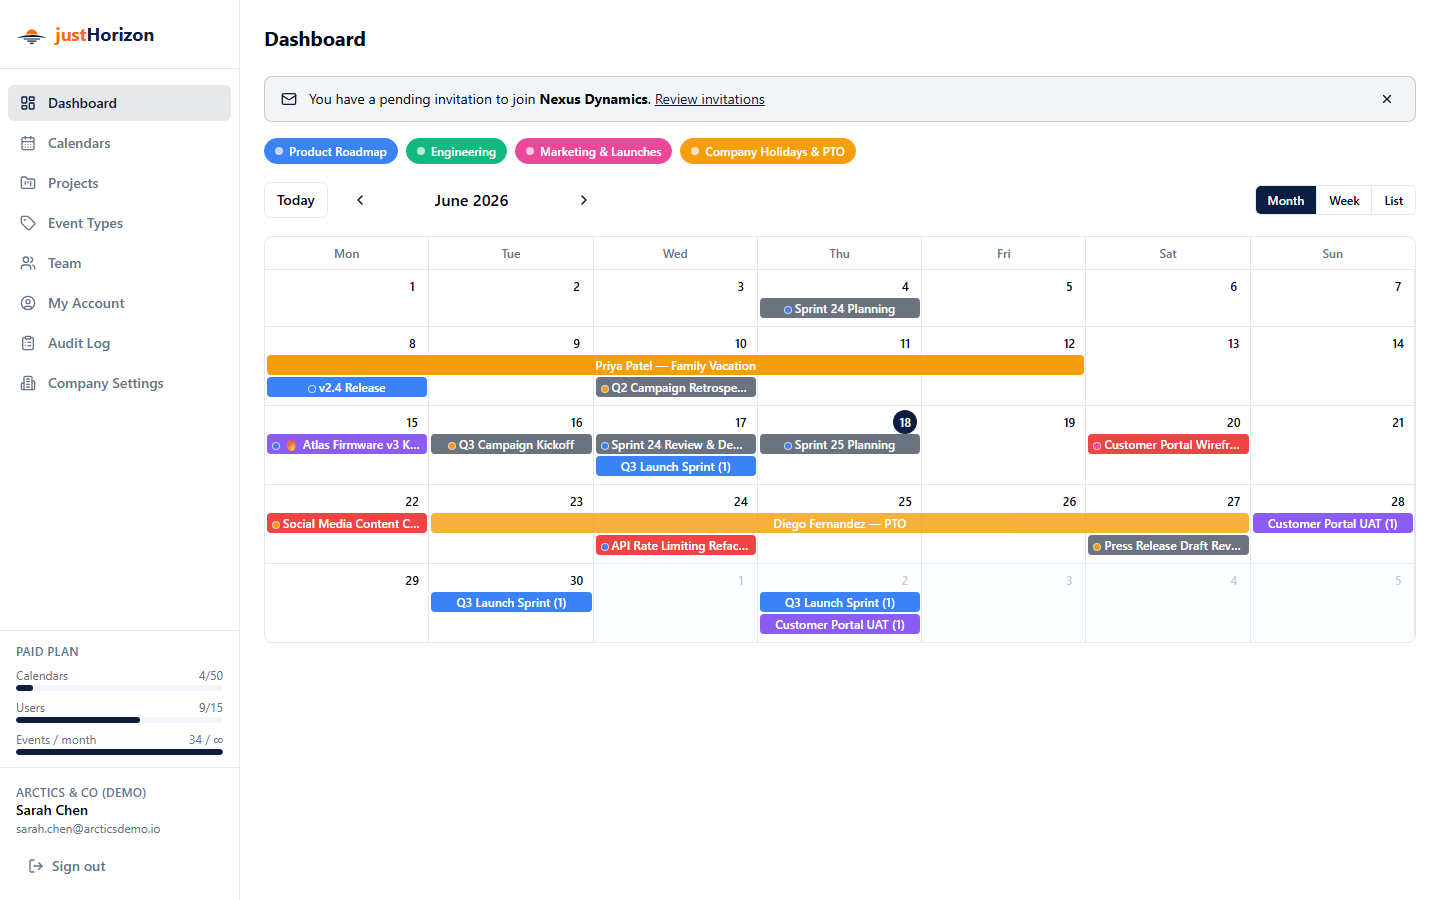
A pending invitation banner appears at the top if another company has invited you to join them. Click the link to go to the Team page and respond. The banner can be dismissed with the × button — it reappears on your next visit if the invite is still pending.
Sidebar & usage meters
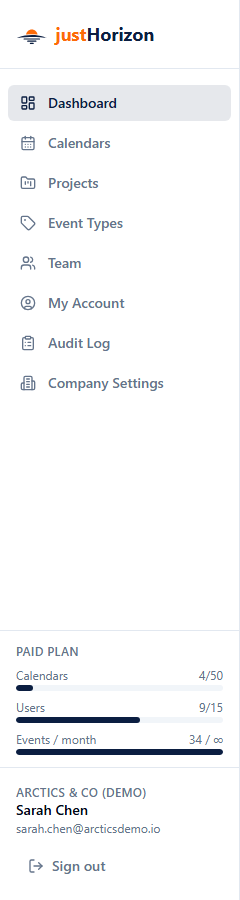
The sidebar is visible on every page. At the bottom it shows:
- Plan label — your current plan ("free plan" / "paid plan").
- Usage meters — progress bars for Calendars, Users, and Events / month showing how much of your plan limit is used. Bars turn red when usage reaches 80% or more.
- Company name — the workspace you are currently in.
- Your name and email.
Free plan limits: 2 calendars · 3 users · 10 events per month. Paid plan limits are higher and configurable.
3. Calendars
Calendar list (/calendars)
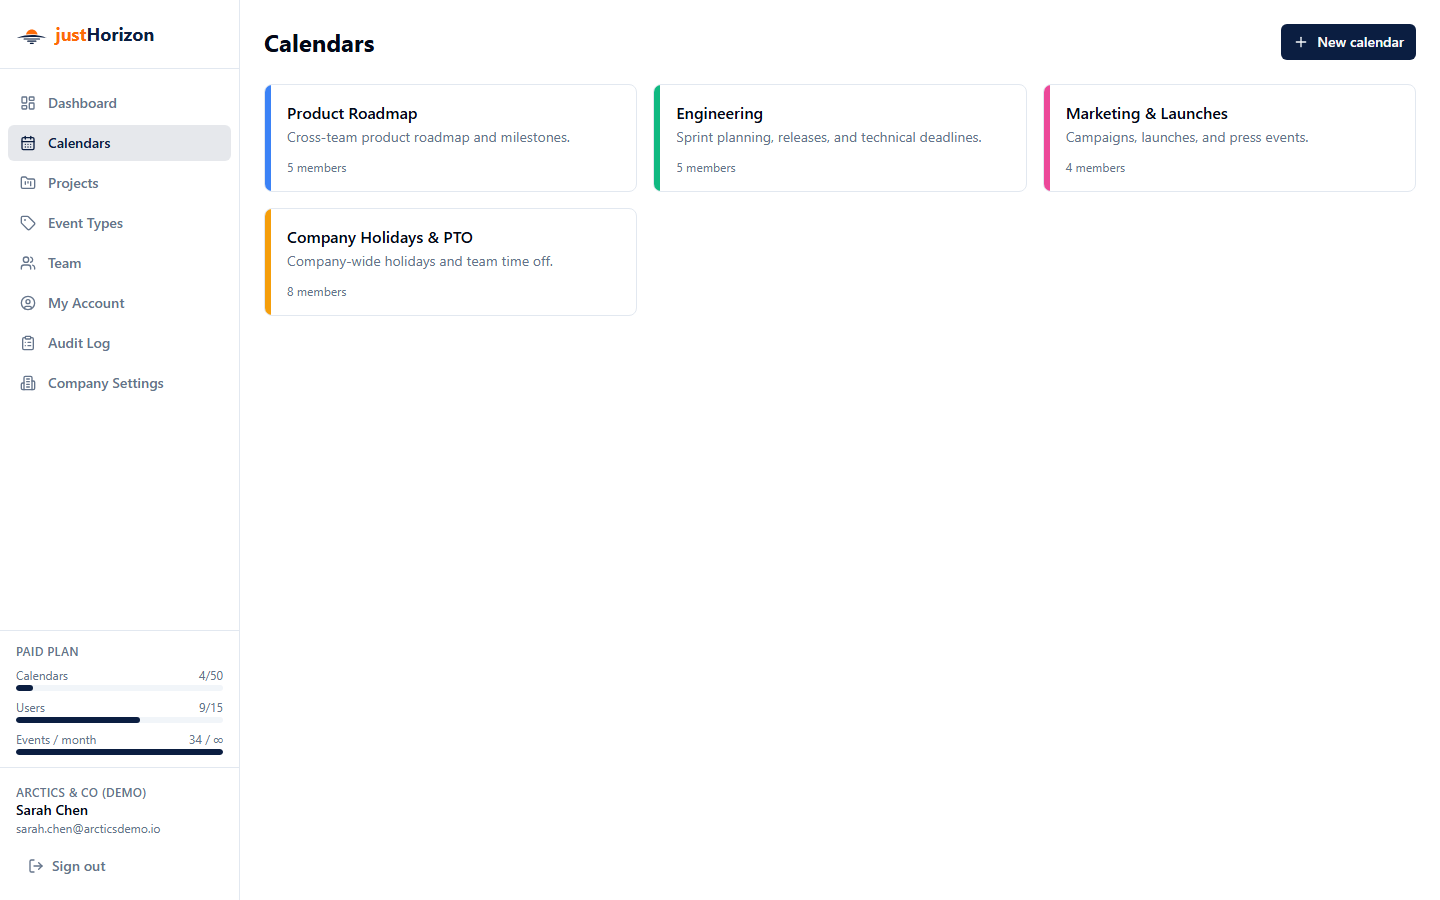
Shows all calendars you have access to. Company viewers see only calendars they've been added to; company admins see all calendars in the workspace. Click a calendar to open it.
Creating a calendar
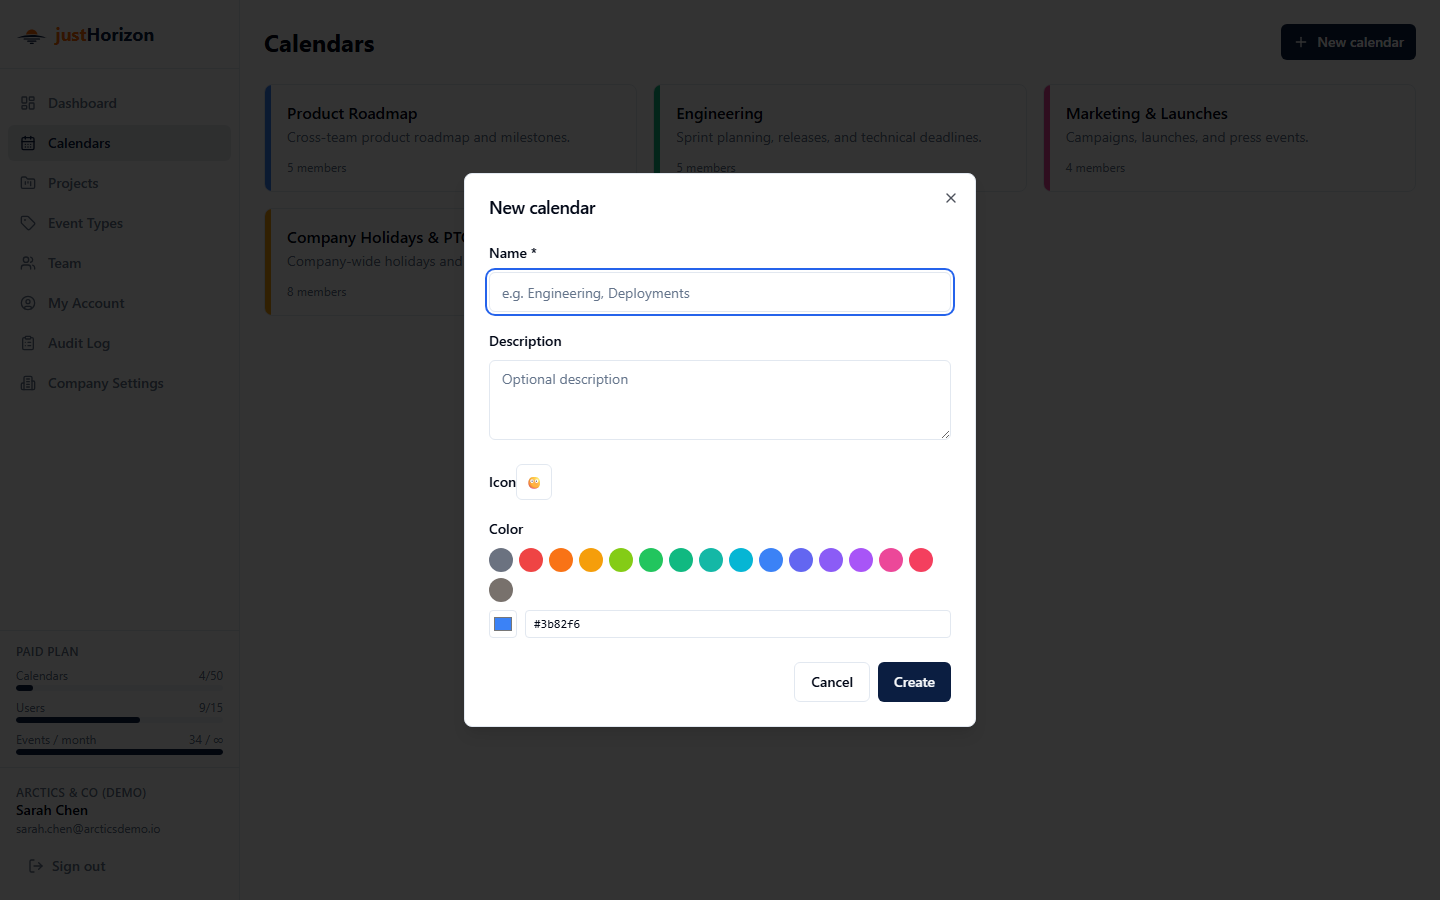
Click New calendar, fill in a name, optional description, color, and icon (emoji). The creator is automatically added as the calendar's admin.
Calendar views
Inside a calendar you can switch between four views using the tabs at the top:
| View | Description |
|---|---|
| Month | Grid by month. Multi-day events span across days. |
| Week | Side-by-side days for the current week. |
| List | Chronological list of upcoming events. |
| Year | Compact year grid showing event density per day. Click any month to jump to that month in Month view. |
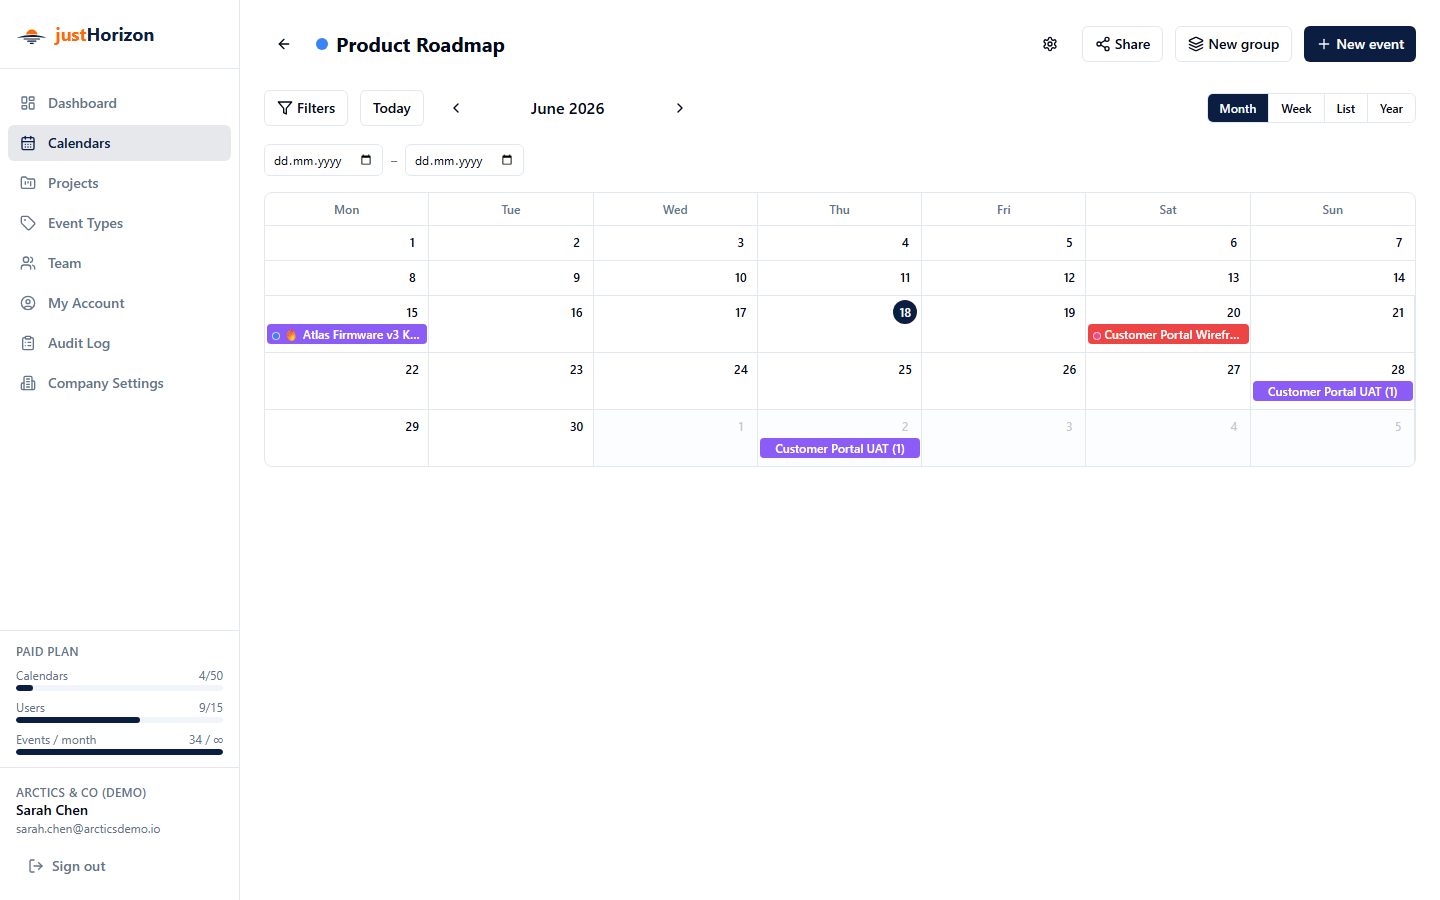
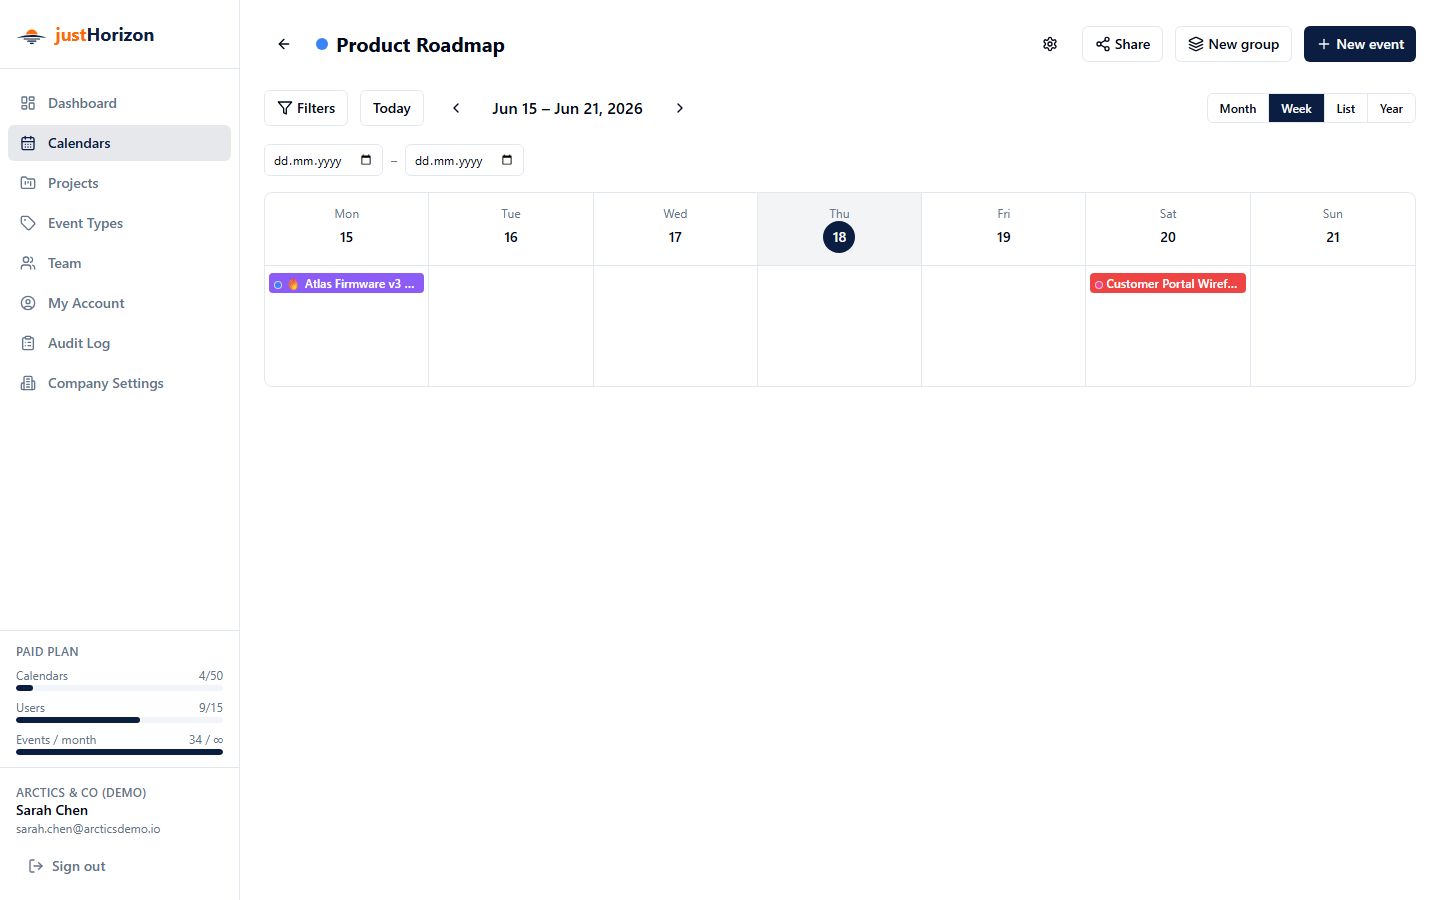
In Week view, each day column shows up to 5 event bars. If a day has more than 5, a +N more link appears — click it to expand the column and show all events. Click show less to collapse.
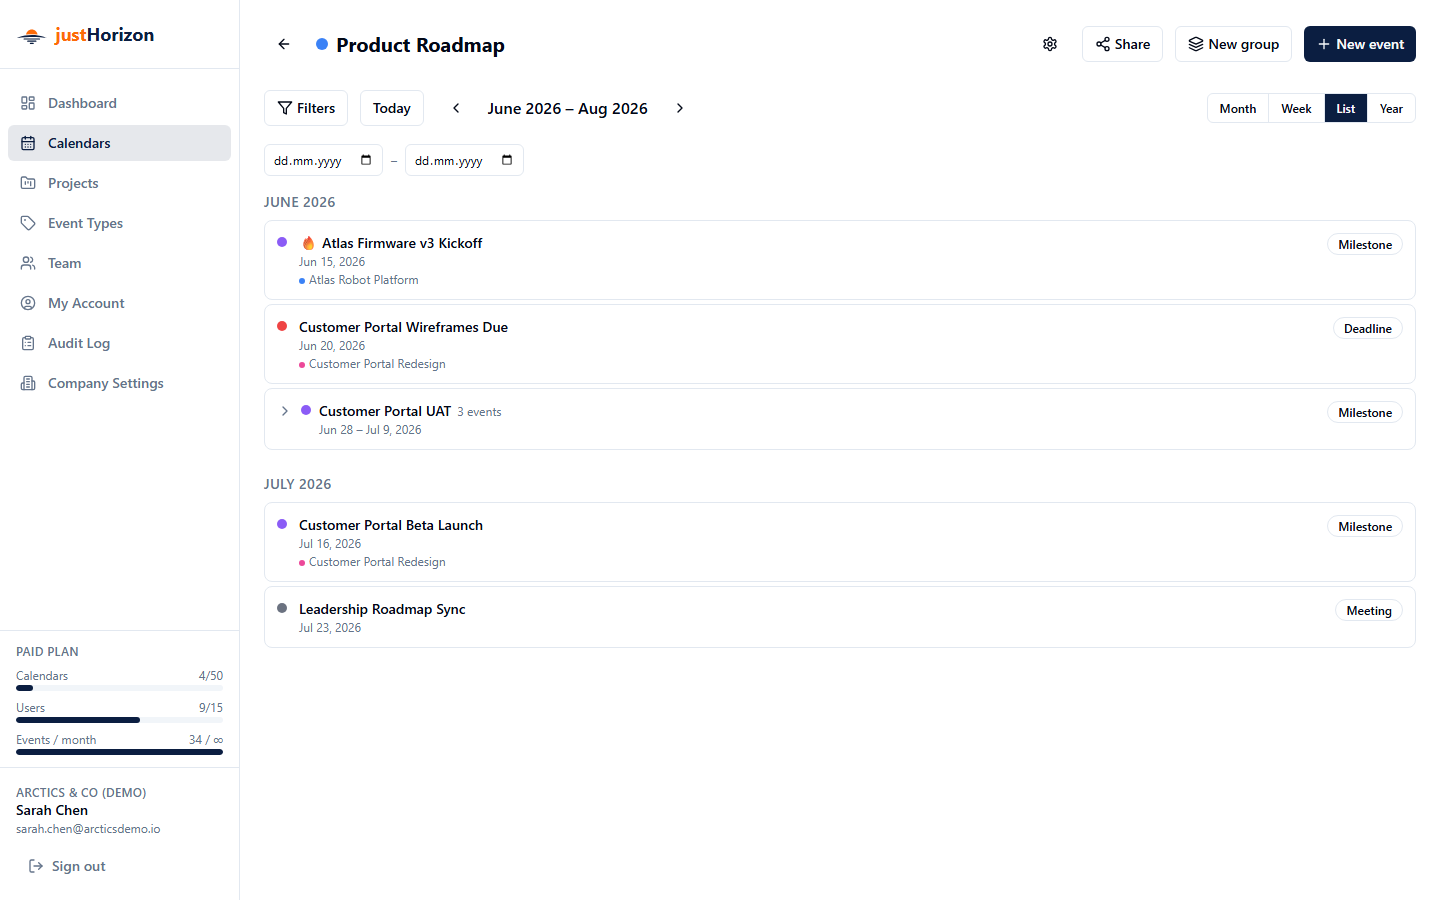
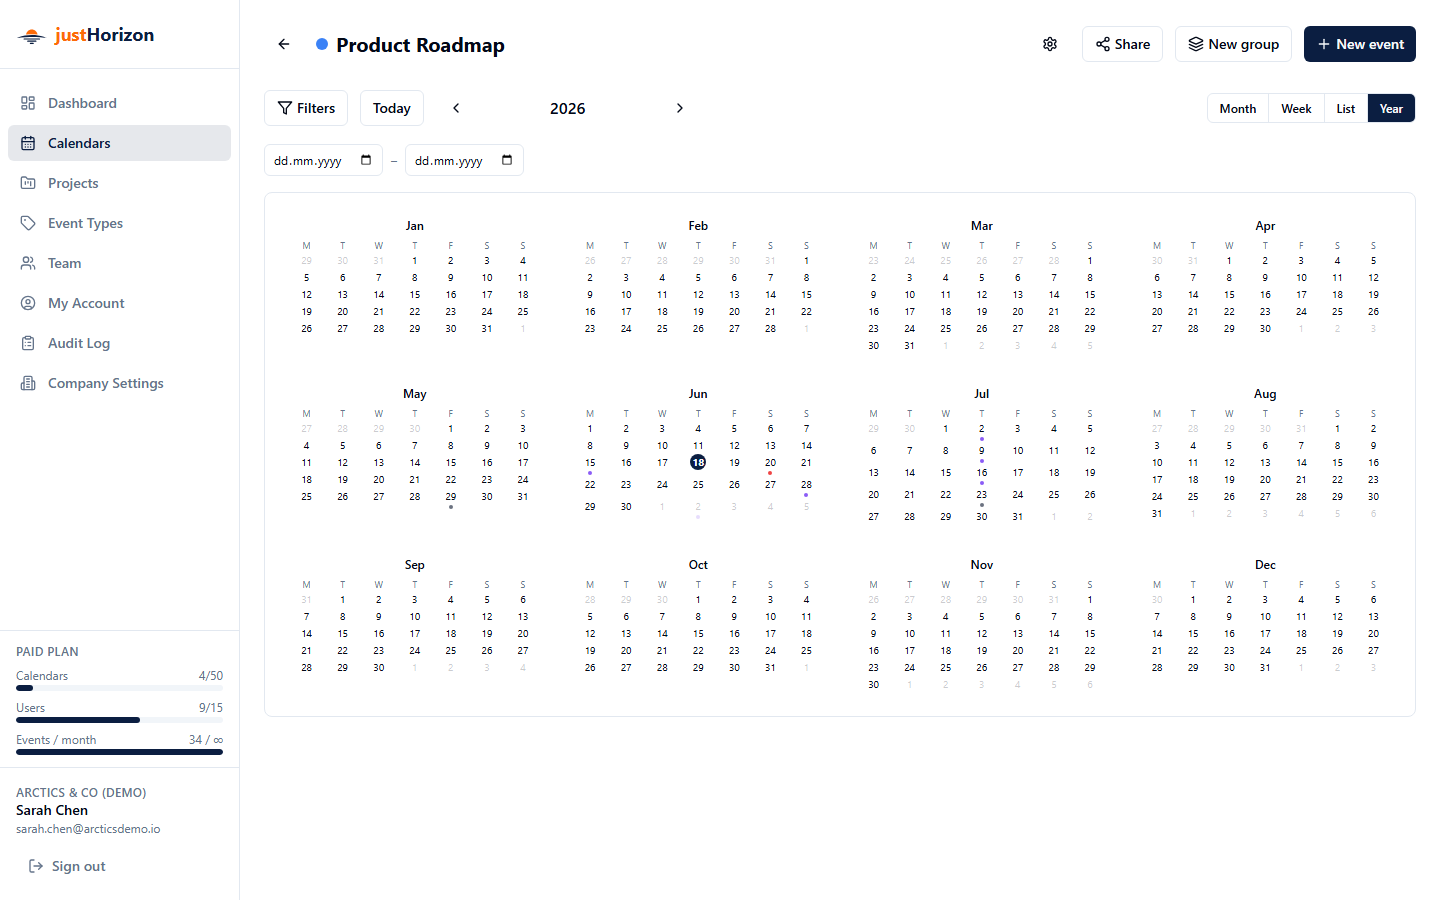
Click any day in Month or Week view to open the "New event" form pre-filled with that date.
Date range filter
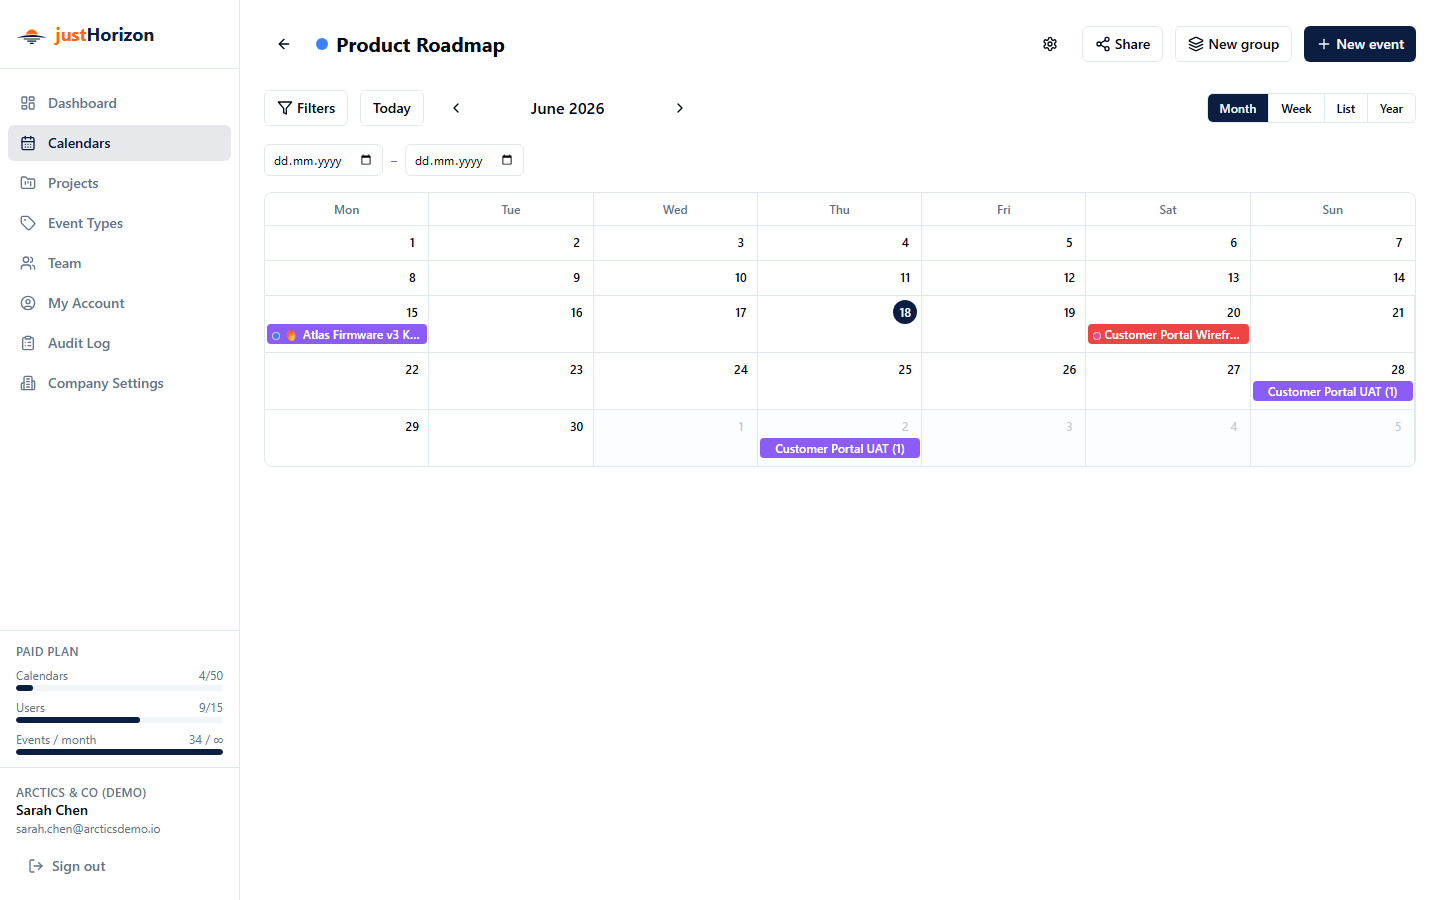
Use the From and To date inputs in the calendar header to restrict the visible date window. This is independent of the current view (month/week/list/year) and useful for focusing on a specific period. Clear the fields to return to the default view window.
Calendar access & membership
Calendars are private by default. A user must be explicitly added as a member to see a calendar — it will not appear in their calendar list otherwise.
The only exception is Company Admins, who can see and manage every calendar in the company regardless of membership.
Who can see a calendar:
| User | Can see calendar? |
|---|---|
| Added as member (any role) | Yes |
| Not a member, company viewer | No |
| Not a member, company admin | Yes (full admin access) |
Adding a member to a calendar
In Calendar Settings → Members, enter the person's email and select a role. They must already have an account in your company. Once added, the calendar appears in their list immediately.
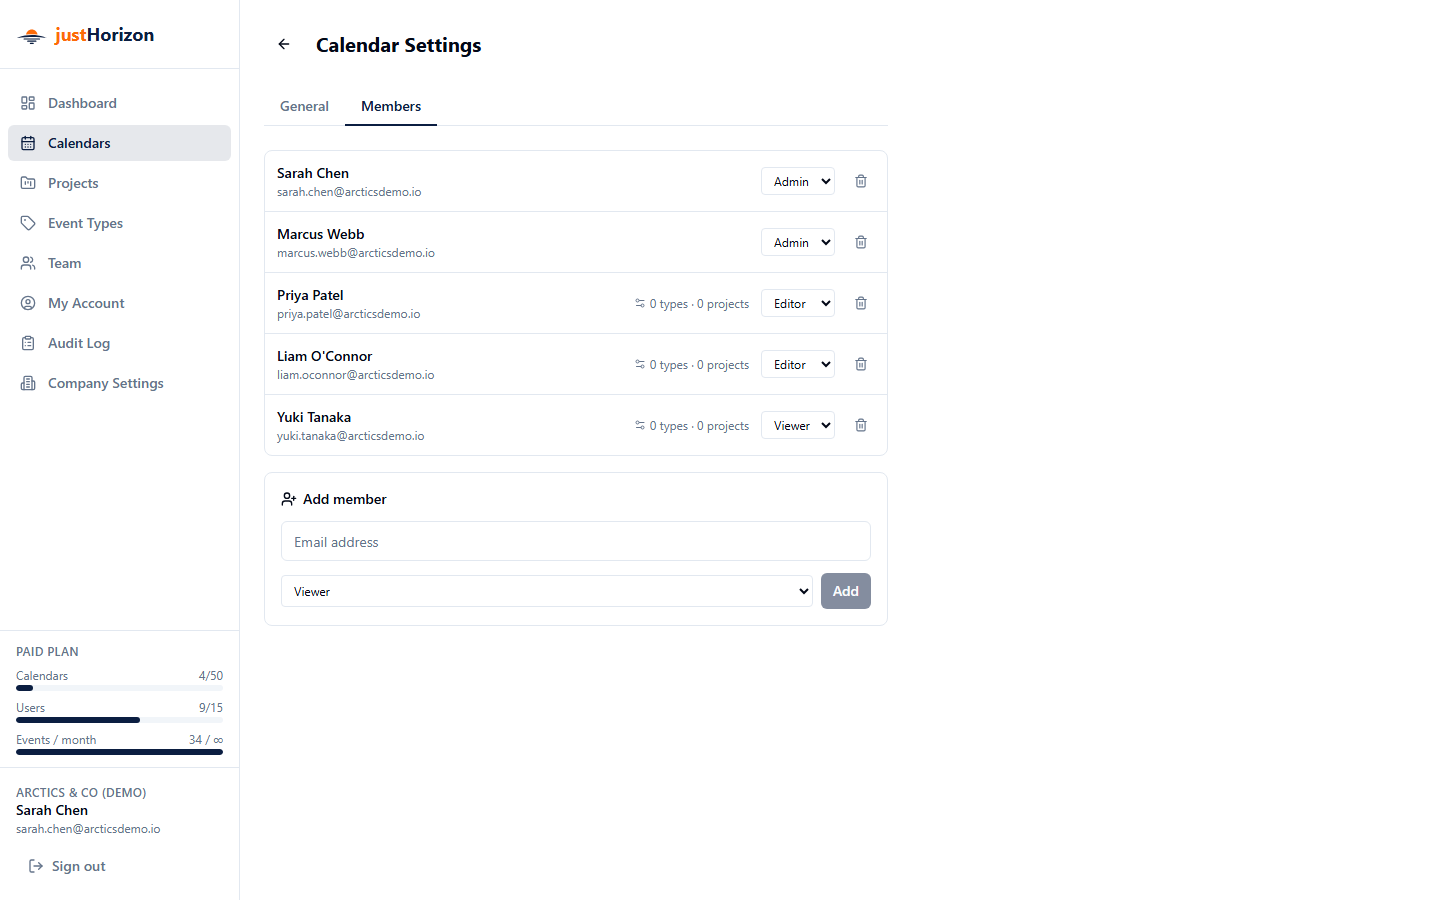
Calendar roles:
| Role | Can view events | Can create/edit/delete events | Can manage members & settings |
|------|:-:|:-:|:-:|
| Viewer | ✓ | — | — |
| Editor | ✓ | ✓ | — |
| Admin | ✓ | ✓ | ✓ |
A calendar always needs at least one admin — the last admin cannot be removed or have their role downgraded until another member is promoted to admin first.
Calendar settings (/calendars/:id/settings)
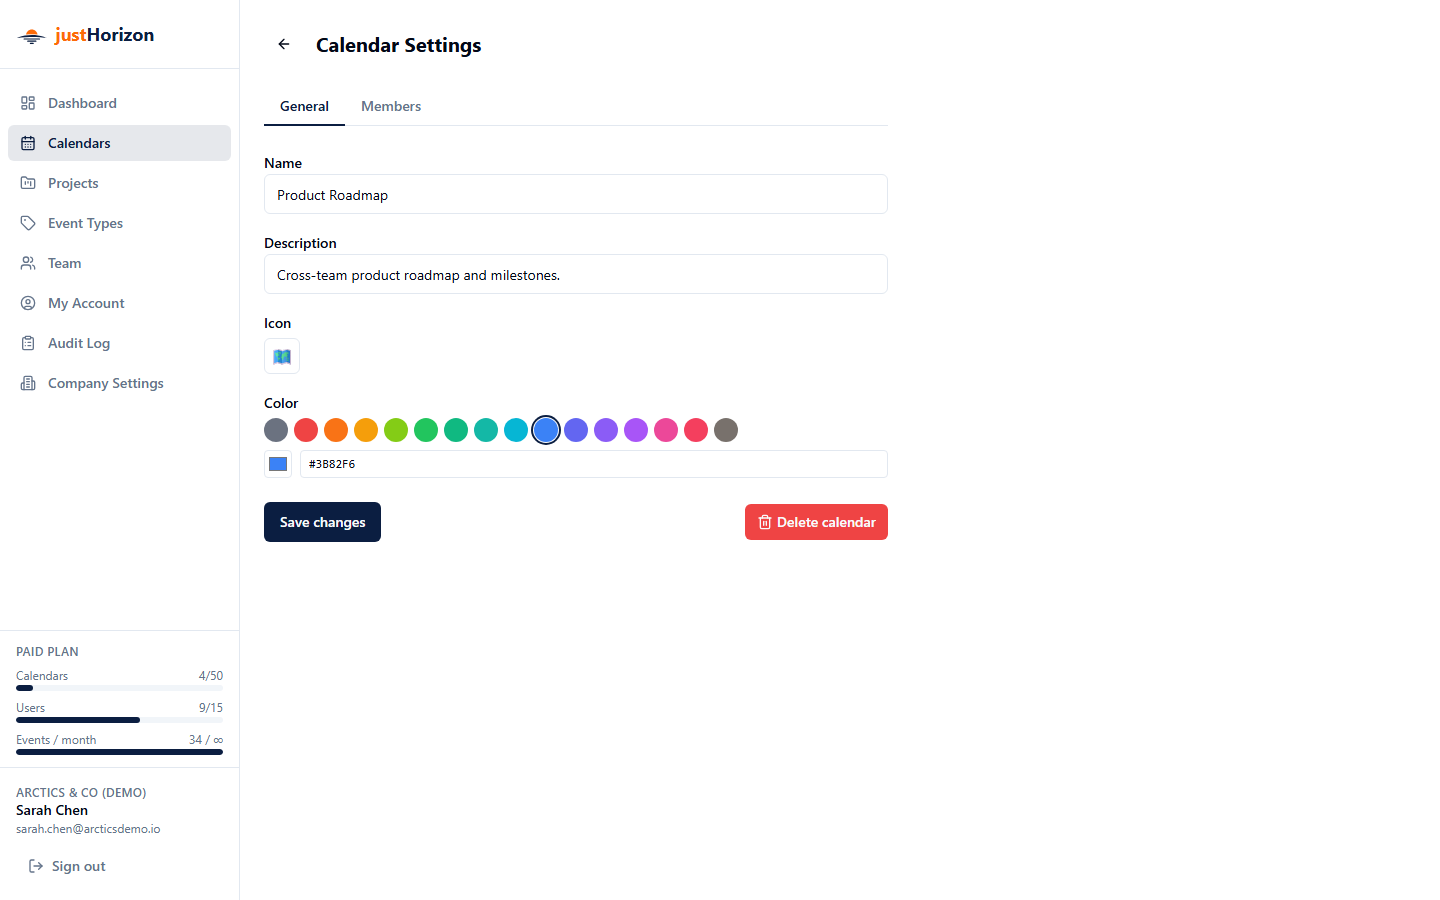
Accessible from the Settings link (calendar admins and company admins only). From here you can:
- Edit the calendar name, description, color, and icon.
- Manage members (add, change roles, remove).
- Delete the calendar. This permanently deletes all events on the calendar — there is no undo.
4. Events
Creating an event
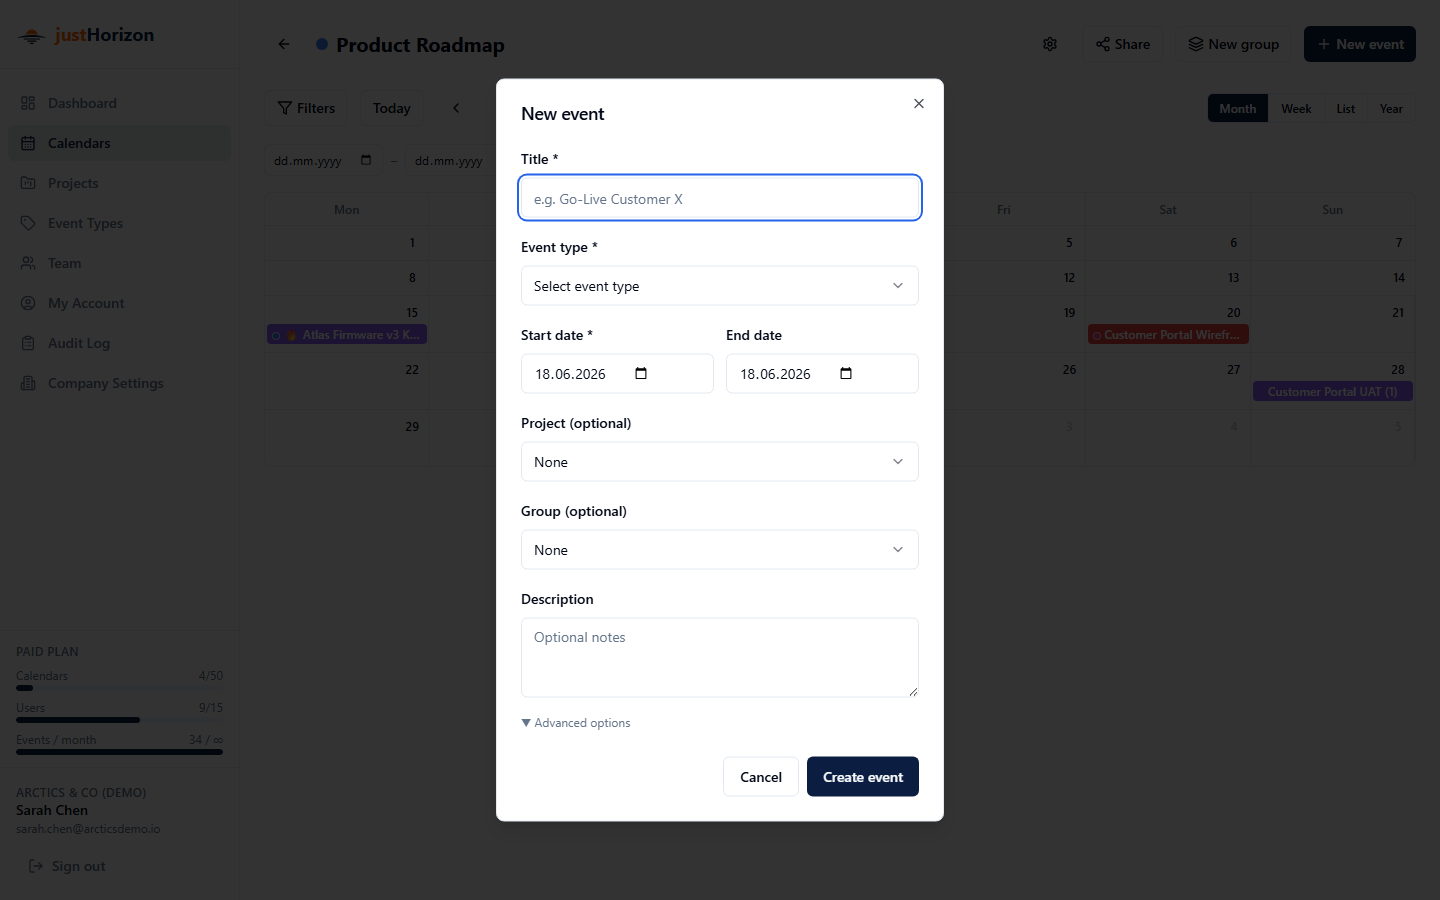
Click New event (requires calendar editor or admin role) or click a day cell directly to open the form pre-filled with that date.
Fields:
| Field | Notes |
|---|---|
| Title | Required |
| Start / End date | End date auto-advances if you move the start date past it |
| Event type | Required; drives the color shown on the calendar |
| Project | Optional; links the event to a project |
| Description | Free text |
| Group | Optional; assigns the event to an event group |
| Icon | Optional emoji — under Advanced options (collapsed by default) |
| Color | Optional override — under Advanced options. Overrides the event type color for this event only. The color picker offers 16 presets, a hex input, and a native OS color picker. Choose the clear swatch to remove a previously set override. |
Viewing an event
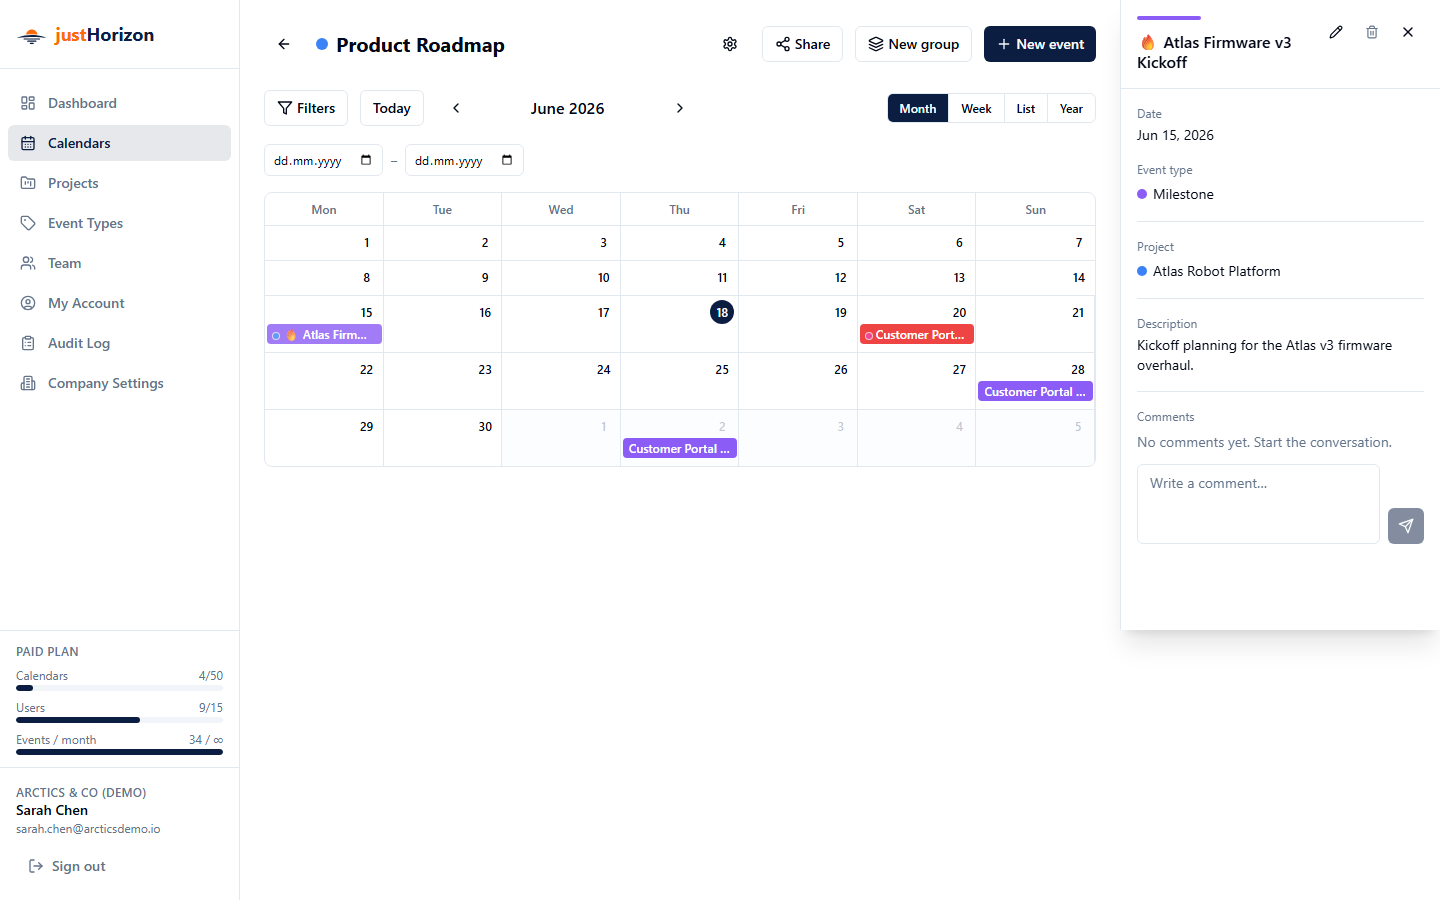
Click any event bar or list row to open the Event detail panel on the right. From there you can edit or delete the event (editor/admin role required).
Event comments
The detail panel includes a Comments section at the bottom. Any user who can view the calendar can read and post comments on its events.
- Type a message and press Enter (or click the send button) to post.
- Press Shift+Enter for a newline within a message.
- Hover over your own comment to reveal a delete button. You can only delete your own comments.
Comments are visible to all members of the calendar.
Editing & deleting
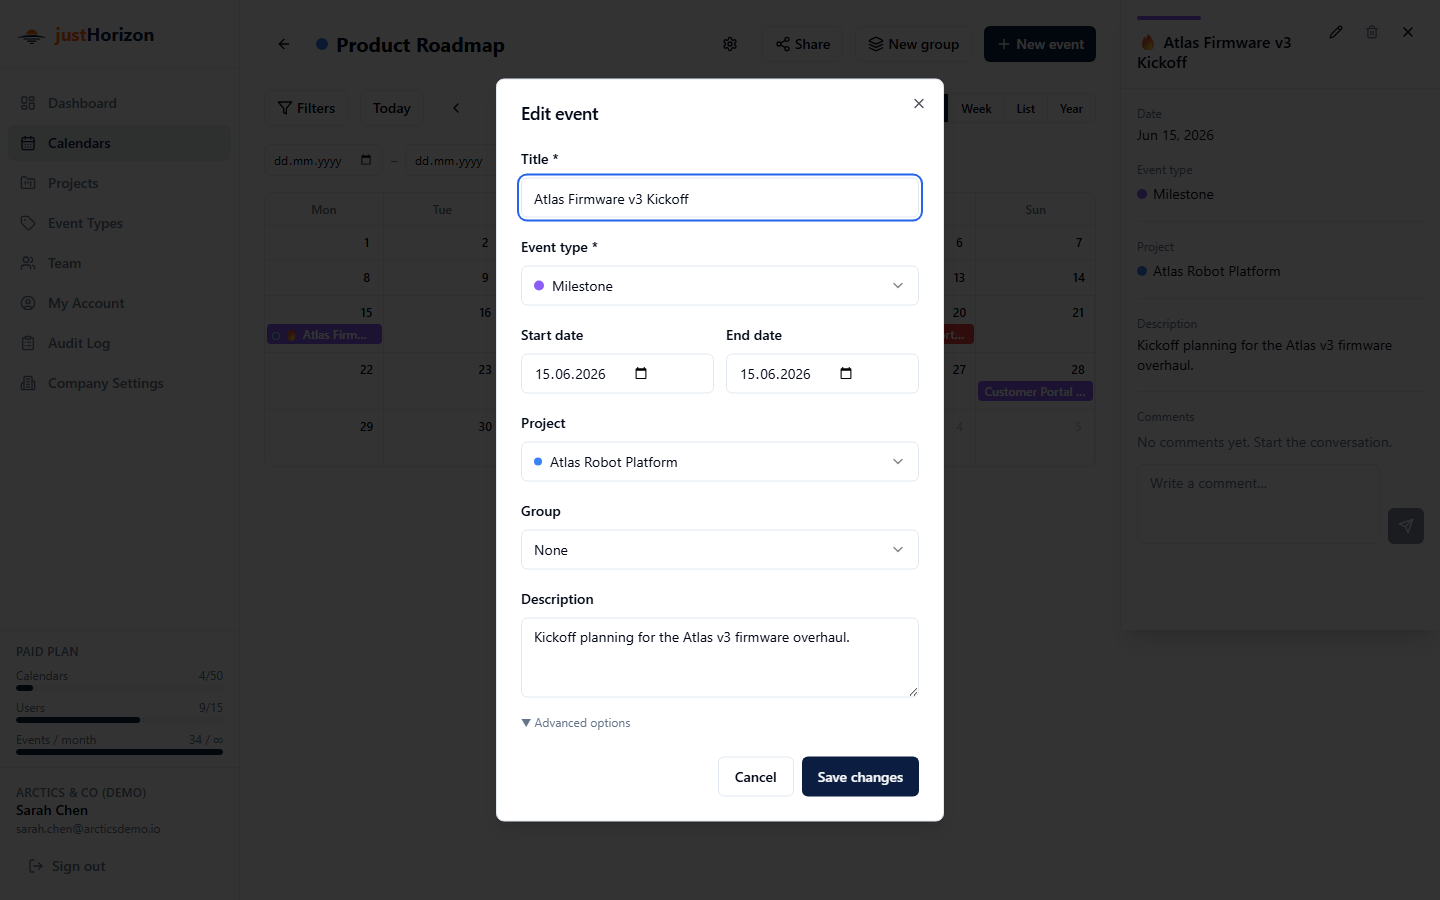
Open the detail panel and click Edit or Delete. Deleting requires at least editor role on the calendar.
5. Event Groups
Event groups let you bundle related events into a single bar that spans the combined date range of all its members.
Creating a group
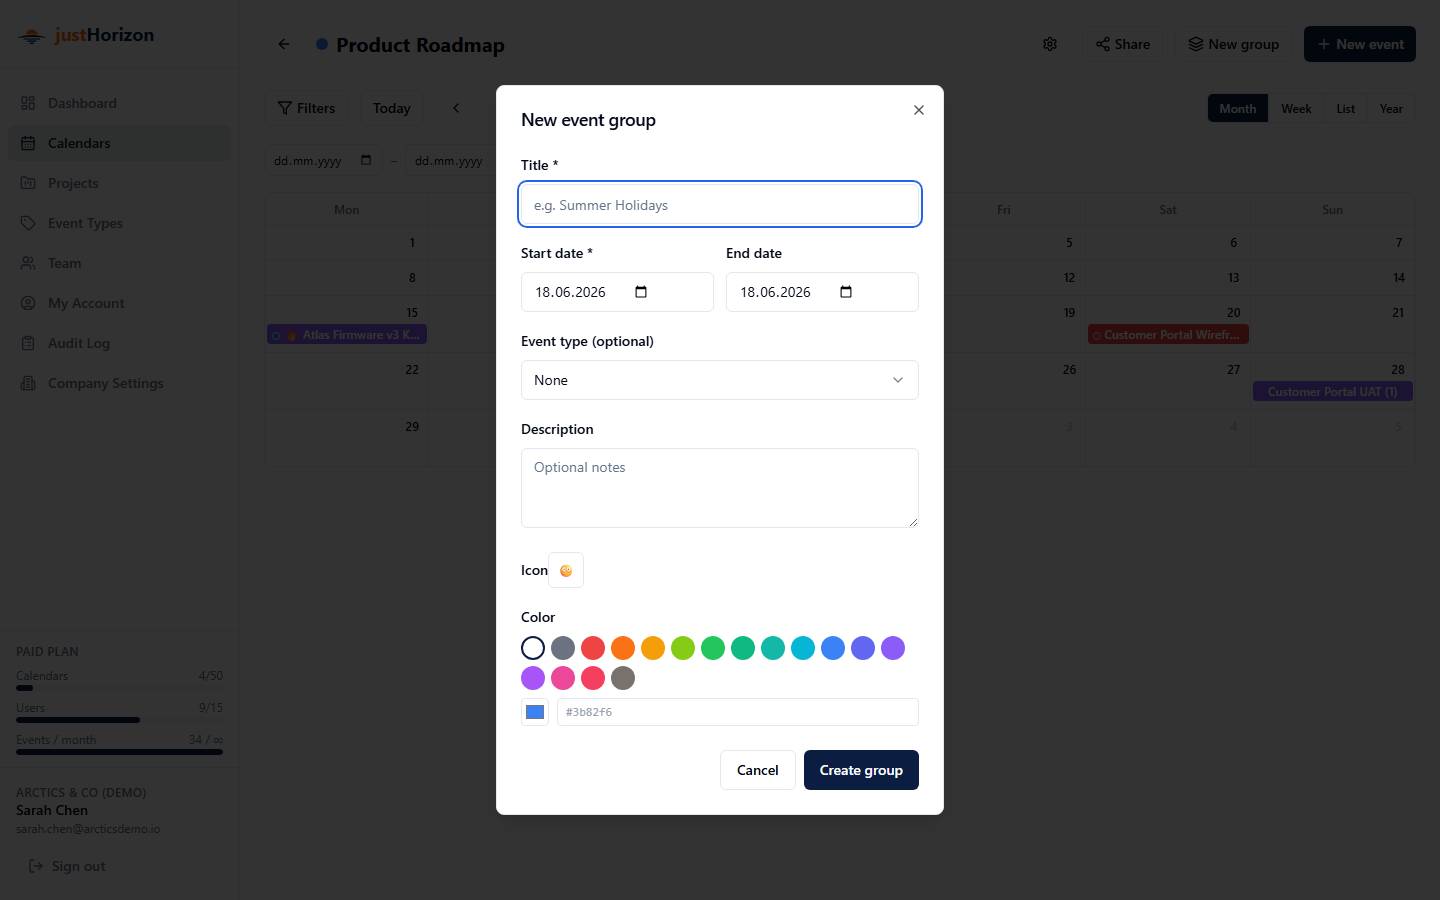
Click New group (editor or admin role required). Fields: title, start date, end date, optional event type (determines the bar color if no custom color is set), description, icon, and color.
The group's start and end dates are kept in sync automatically whenever a member event is created, updated, or deleted — you never need to update the group dates manually.
Adding events to a group
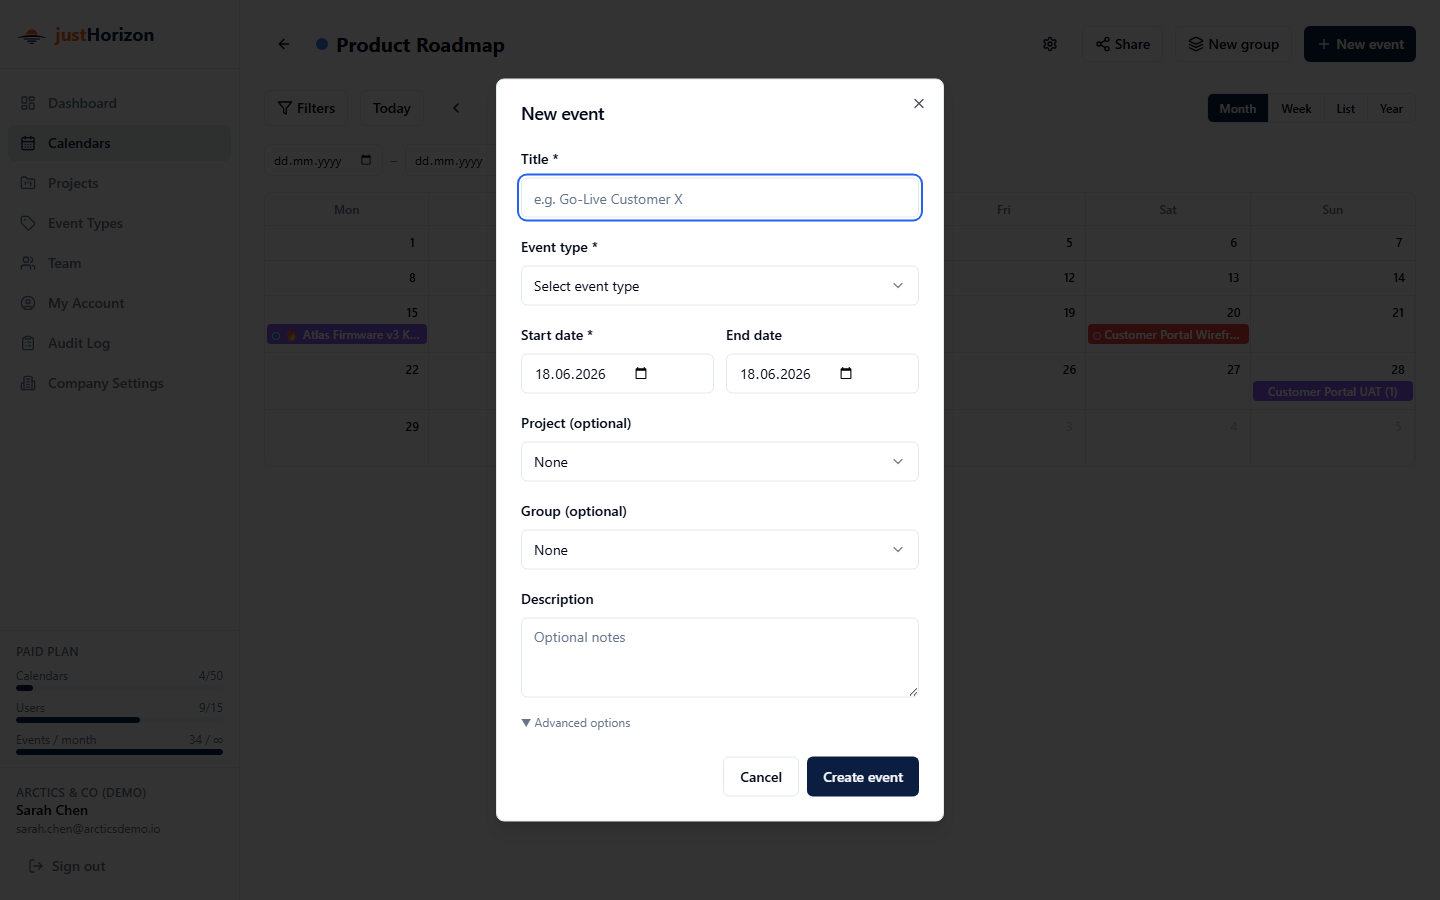
When creating or editing an event, select a group from the Group dropdown. The event immediately becomes a member and the group dates update.
Group display on the calendar
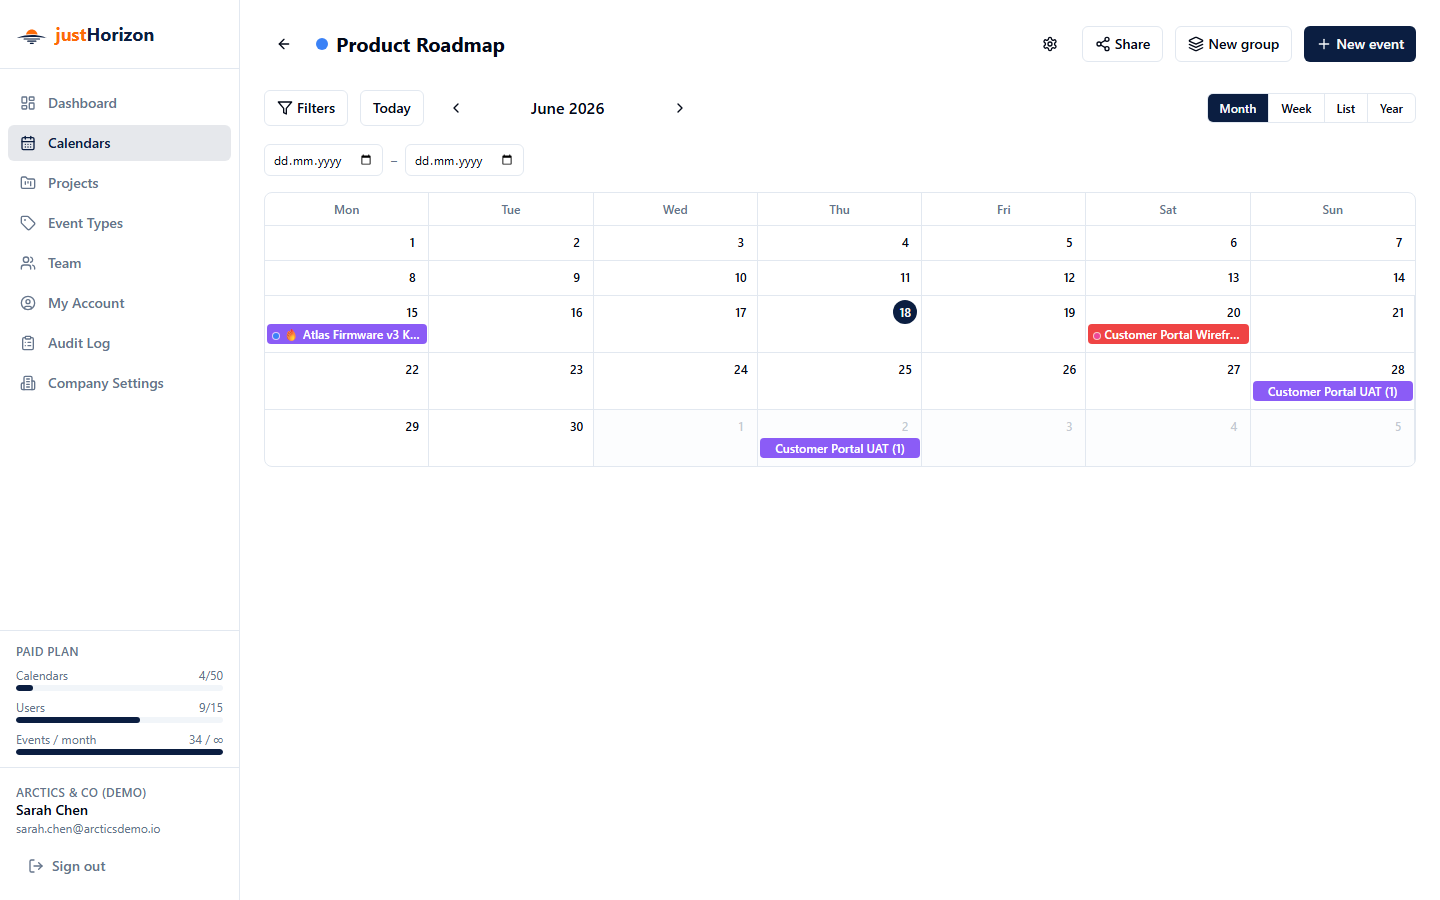
Groups appear as colored bars in Month and Week views. They do not appear in Year view. In List view, groups render as expandable rows — click the chevron to expand and see each member event individually. The bar in Month/Week shows only on days when at least one member event is active; gaps between clusters of member events show blank. The bar label displays the group title followed by the count of active member events in parentheses — e.g. "Q3 Sprint (3)".
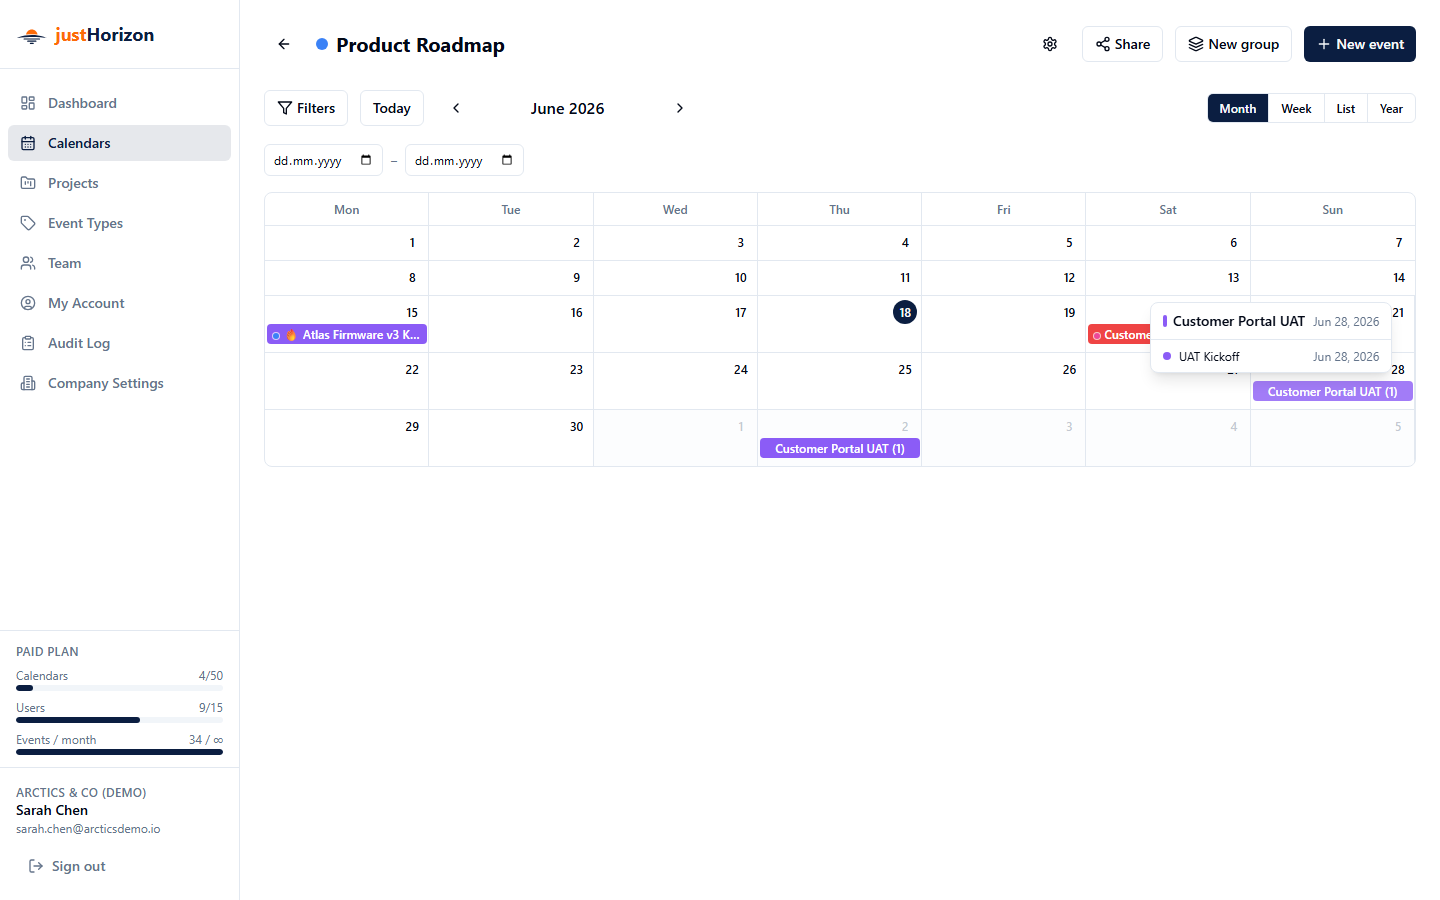
Hover popup: In Month and Week views, hover over a group bar for 300ms to see a popup listing the specific events active on that day, with their dates.
Group detail panel
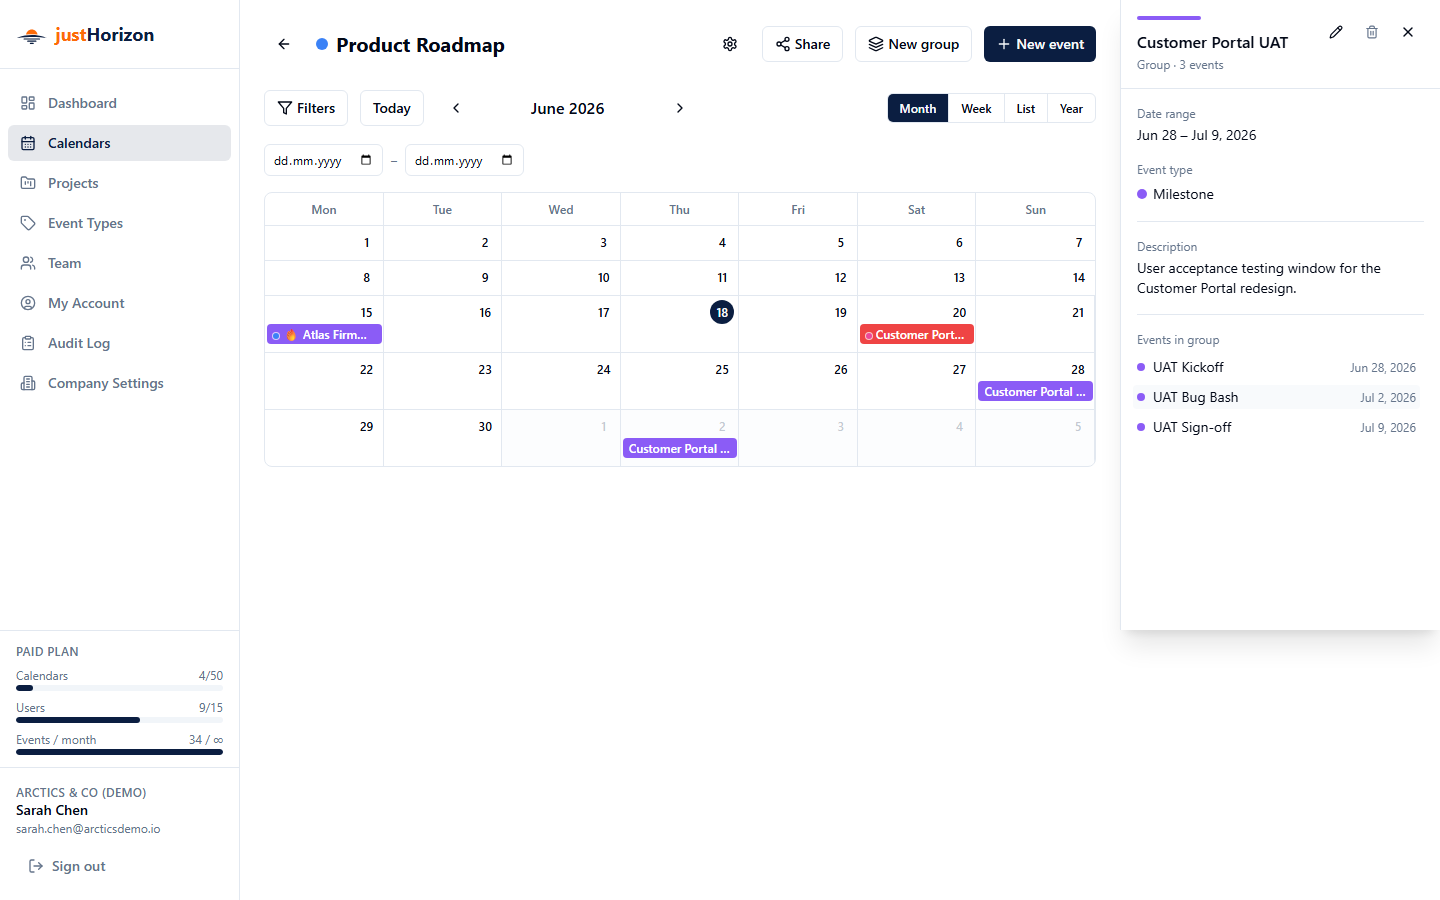
Click a group bar to open the Group detail panel. It lists all member events. Clicking a member event opens the event detail panel.
Editing & deleting a group
From the group detail panel, click Edit to change the title, dates, event type, description, color, or icon (editor/admin role required). Click Delete to remove the group.
Deleting a group does not delete its member events. Events are simply un-assigned from the group — they remain on the calendar individually.
6. Projects
Projects (/projects) let you organize events by initiative or workstream. Unlike calendars, all company members can see all projects — there is no per-project membership. Anyone can browse the project list and view a project's events.
Creating a project
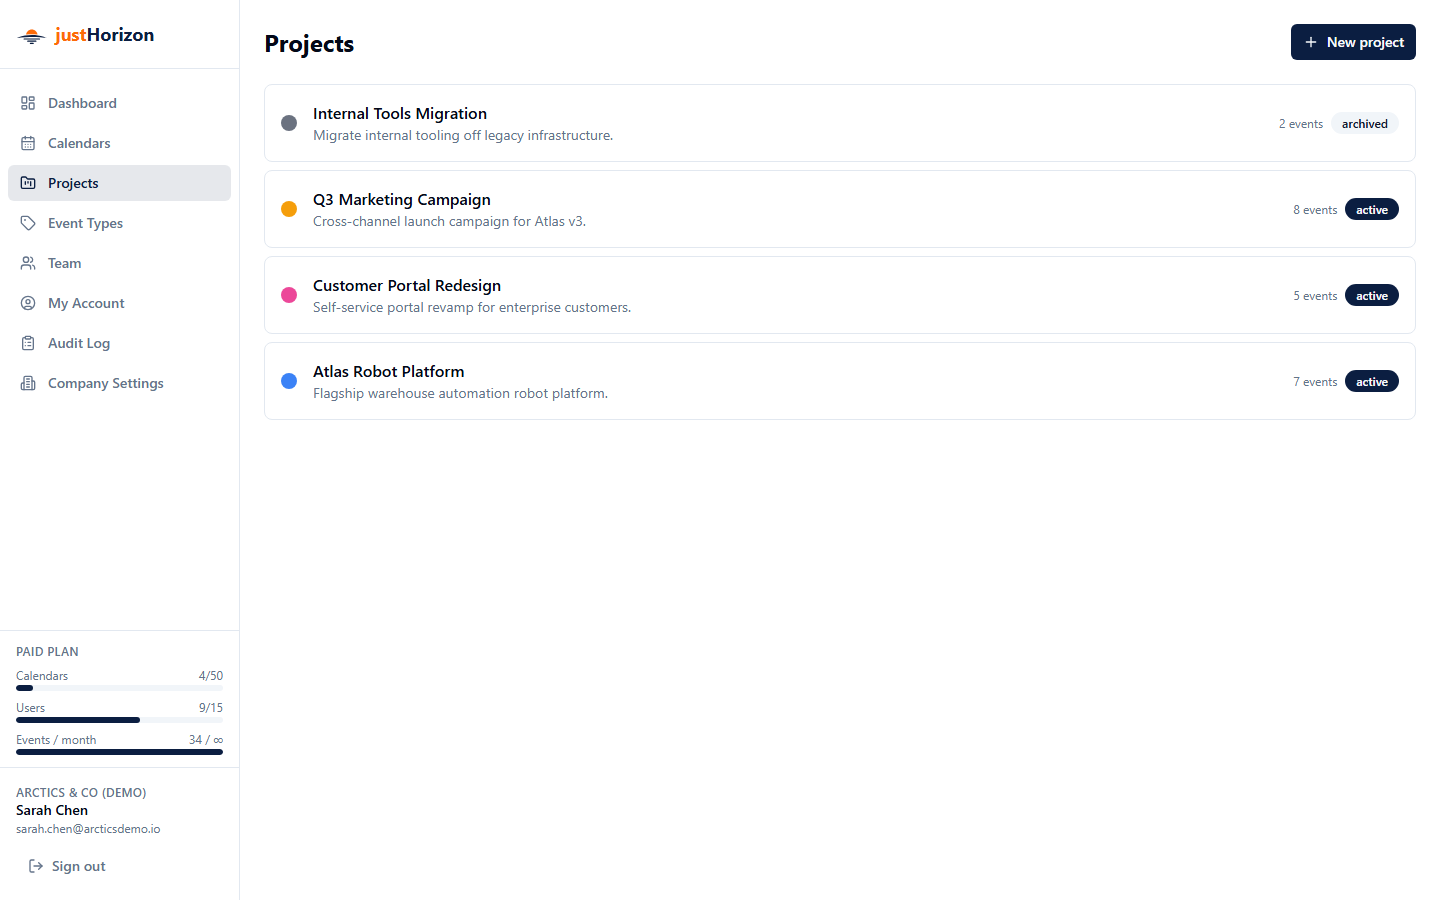
Click New project to open the creation dialog.
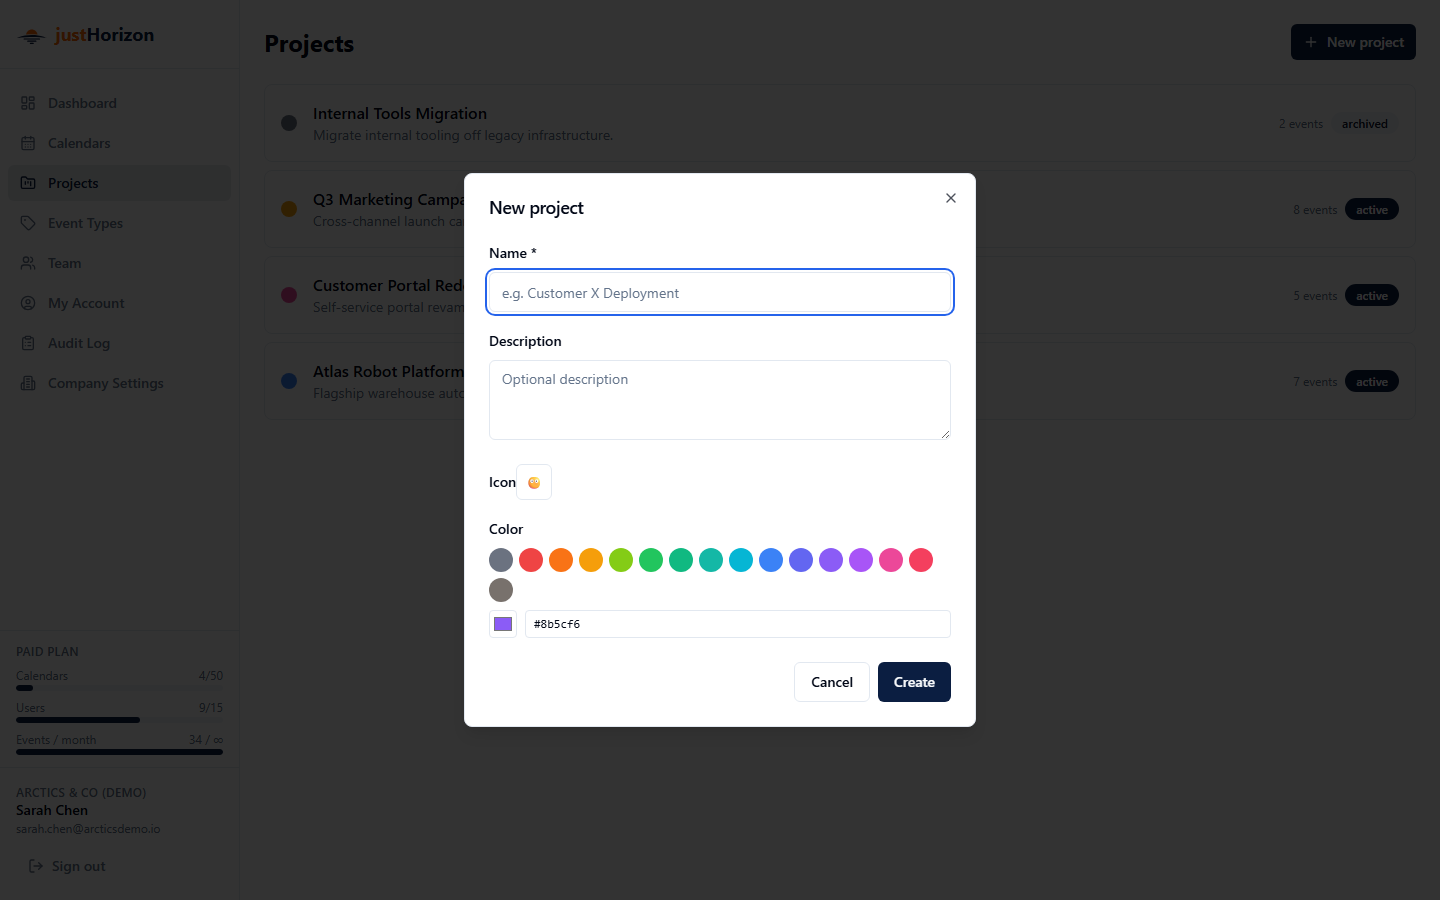
Enter a name, optional description, color, and icon. The project starts as active; you can change the status to archived later from Project Settings.
Project detail page
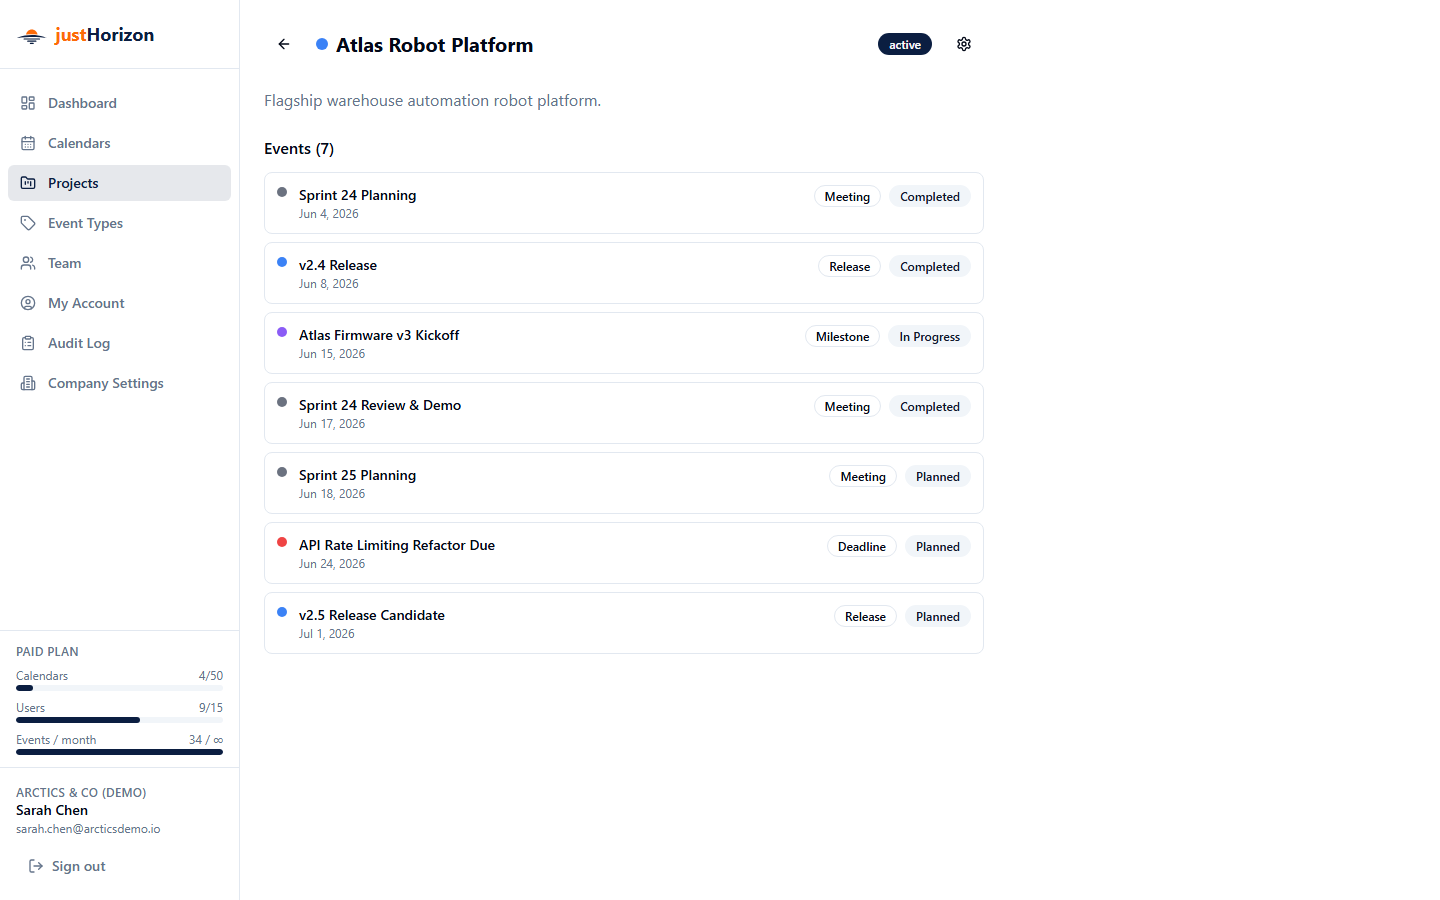
Shows all events linked to the project, with their dates and statuses.
Project settings (/projects/:id/settings)
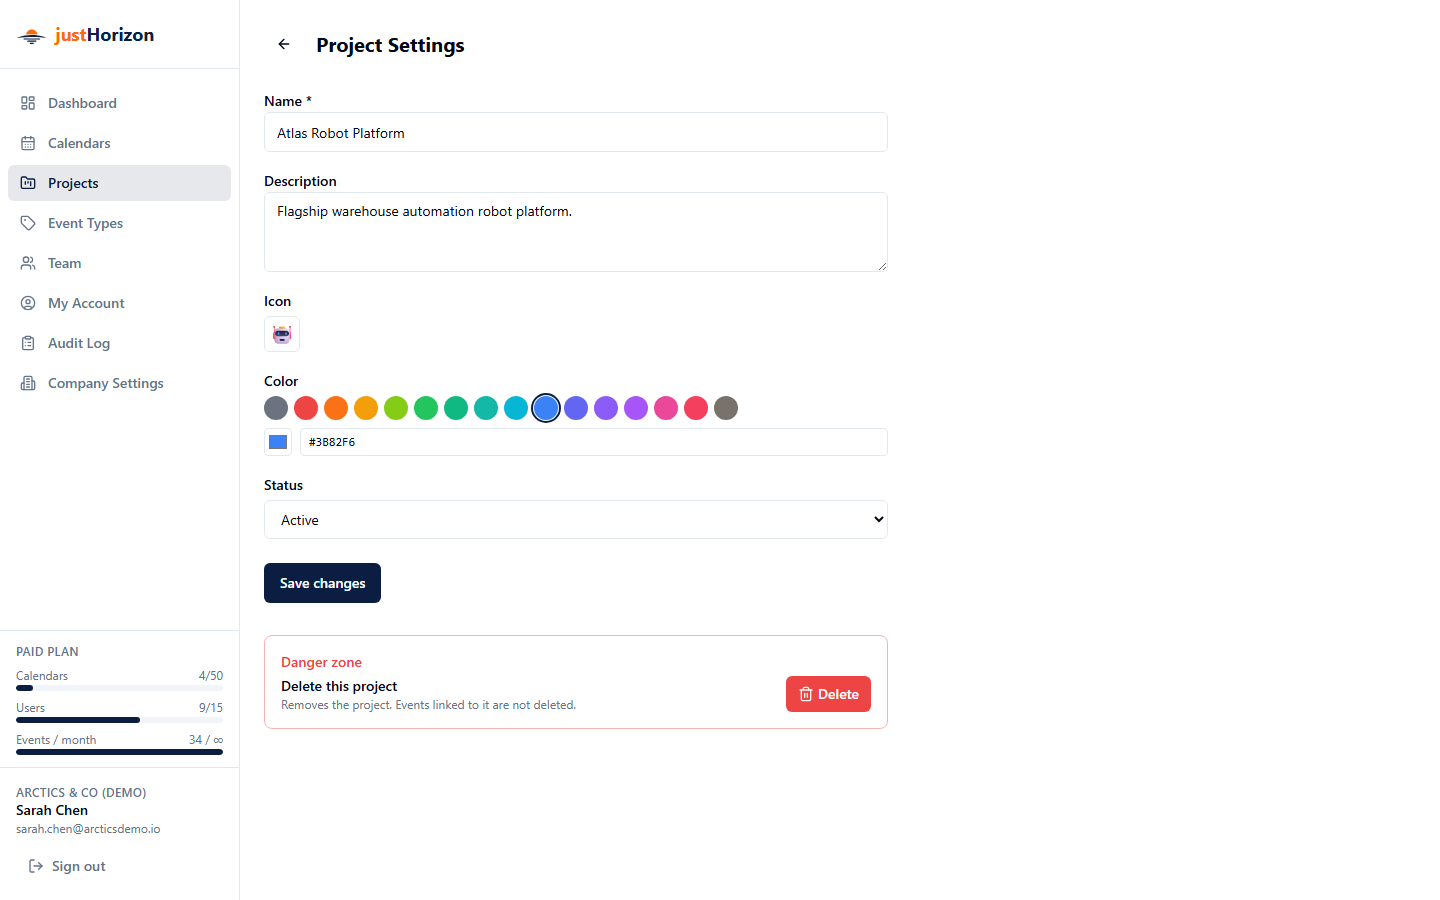
Visible only to the project creator and company admins. From here you can:
- Edit name, description, color, icon, and status (
active/archived). Archiving a project is a label — it does not hide or delete the project's events. - Delete the project (events are not deleted; they lose their project link).
7. Event Types
Event types (/event-types) define the categories of events (e.g. "Go-live", "UAT", "Vacation"). Every event must have an event type.
Managing event types
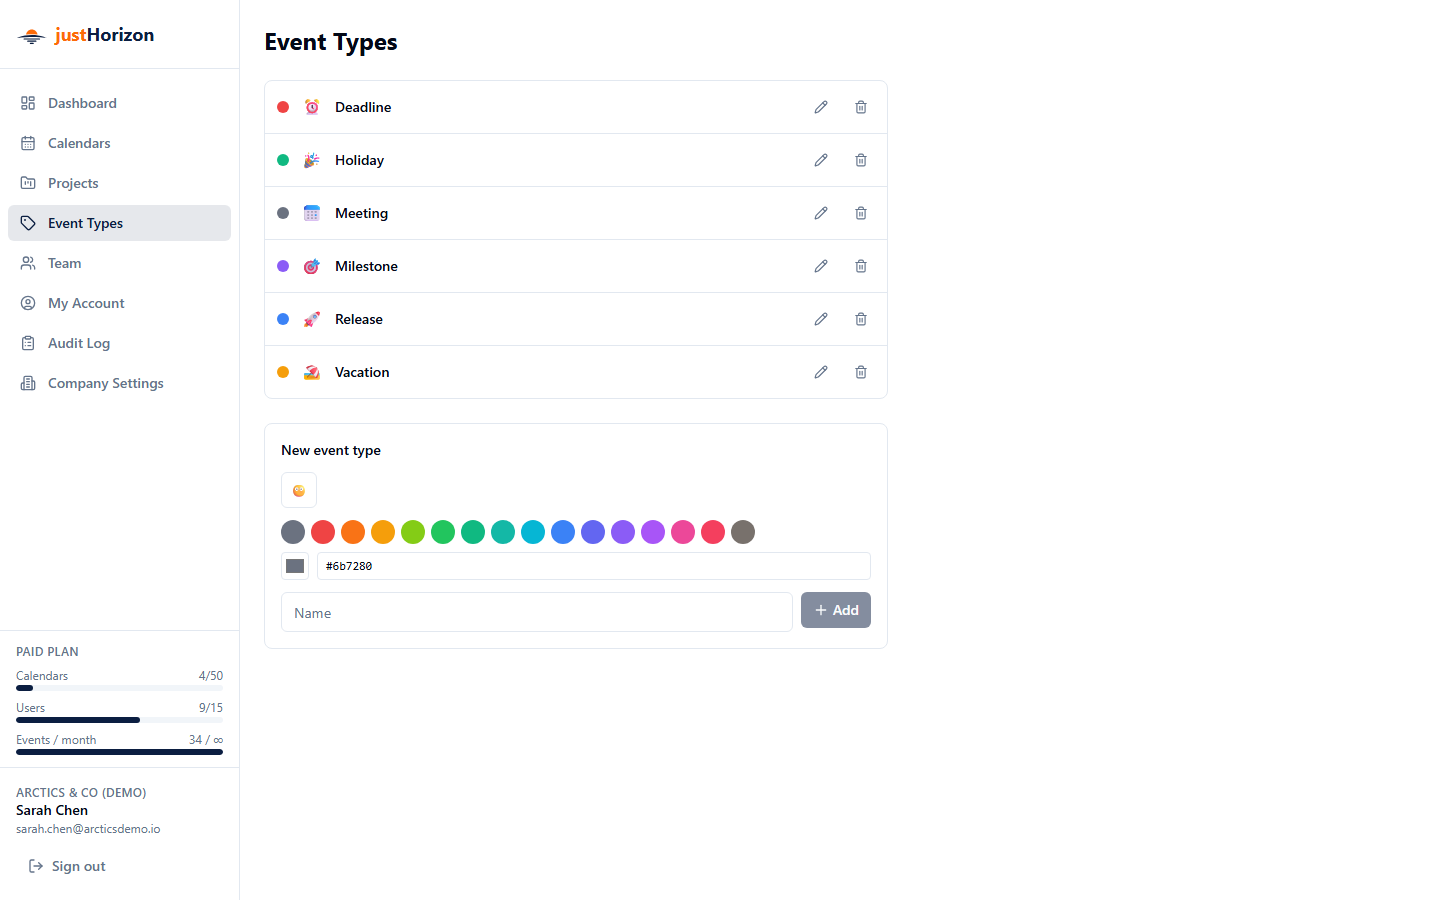
- Create: Fill in the New event type form at the bottom of the page — set a name, color, and optional icon, then click Add.
- Edit: Click the pencil icon next to an existing type to edit its name, color, or icon inline.
- Delete: Click the trash icon next to a type to delete it. The type must not be in use by any events.
8. Team & Invites
Team page (/team)
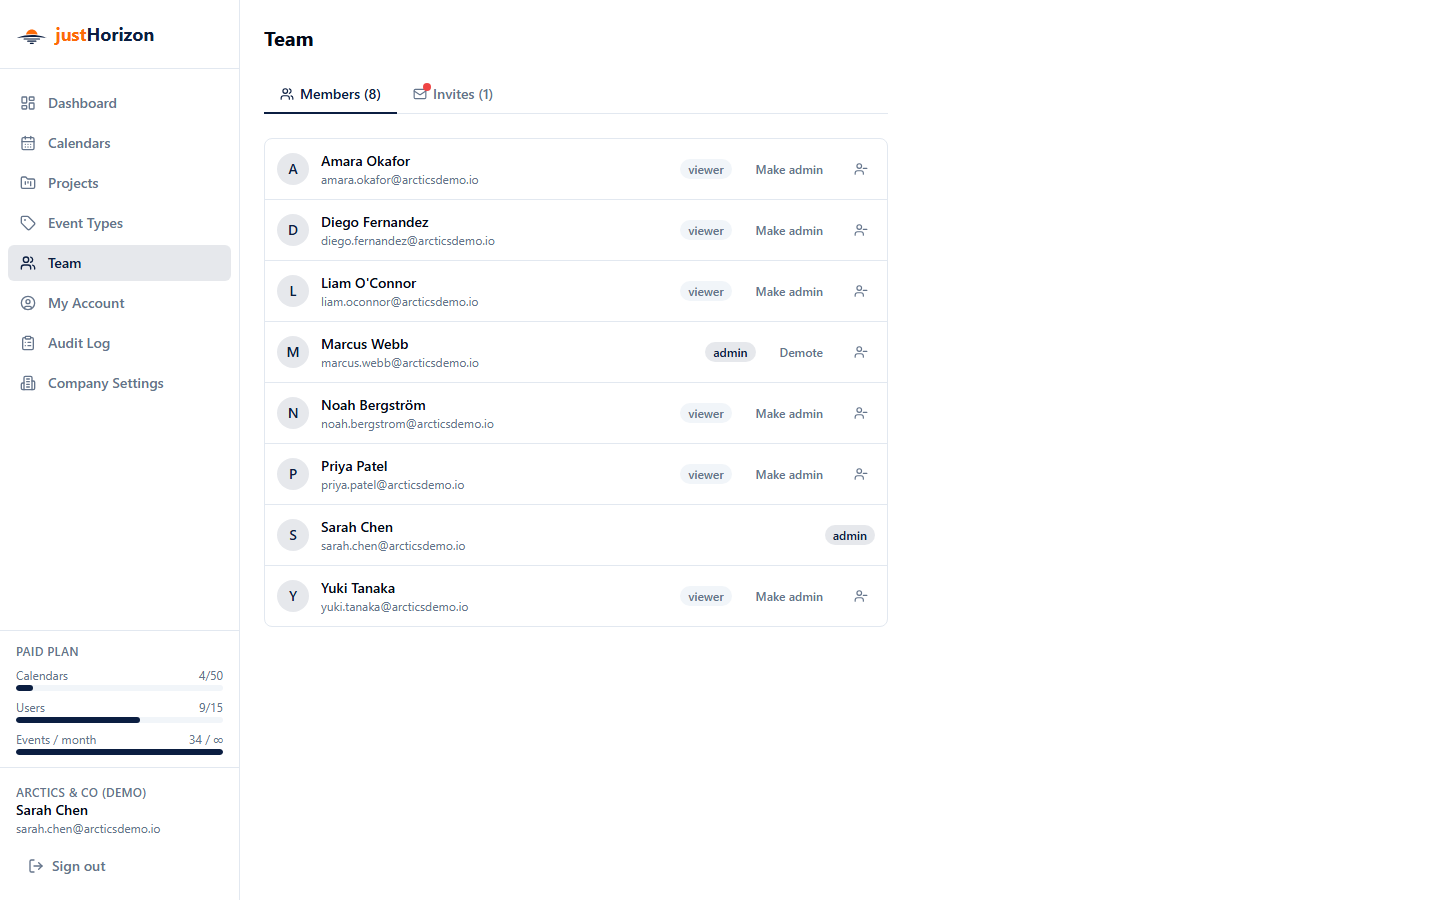
Shows all company members and pending invites. The page has two tabs: Members and Invites.
Company admins can:
- Send email invites to new members.
- Copy the invite link for a pending invite directly from the Invites tab.
- Revoke pending invites.
- Promote a member to admin or demote an admin to viewer (Make admin / Demote button).
- Remove a member from the company (trash icon next to their name).
Inviting a team member
On the Team page, enter the person's email and click Send invite. They receive a link by email valid for 7 days. When they click it and register, they join your company as a Company Viewer. A company admin can then add them to specific calendars with the appropriate role.
Sent invites that haven't been accepted yet appear in the Invites tab on the Team page. Company admins can copy the invite link or revoke any pending invite from there before it is accepted.
Accepting an invitation
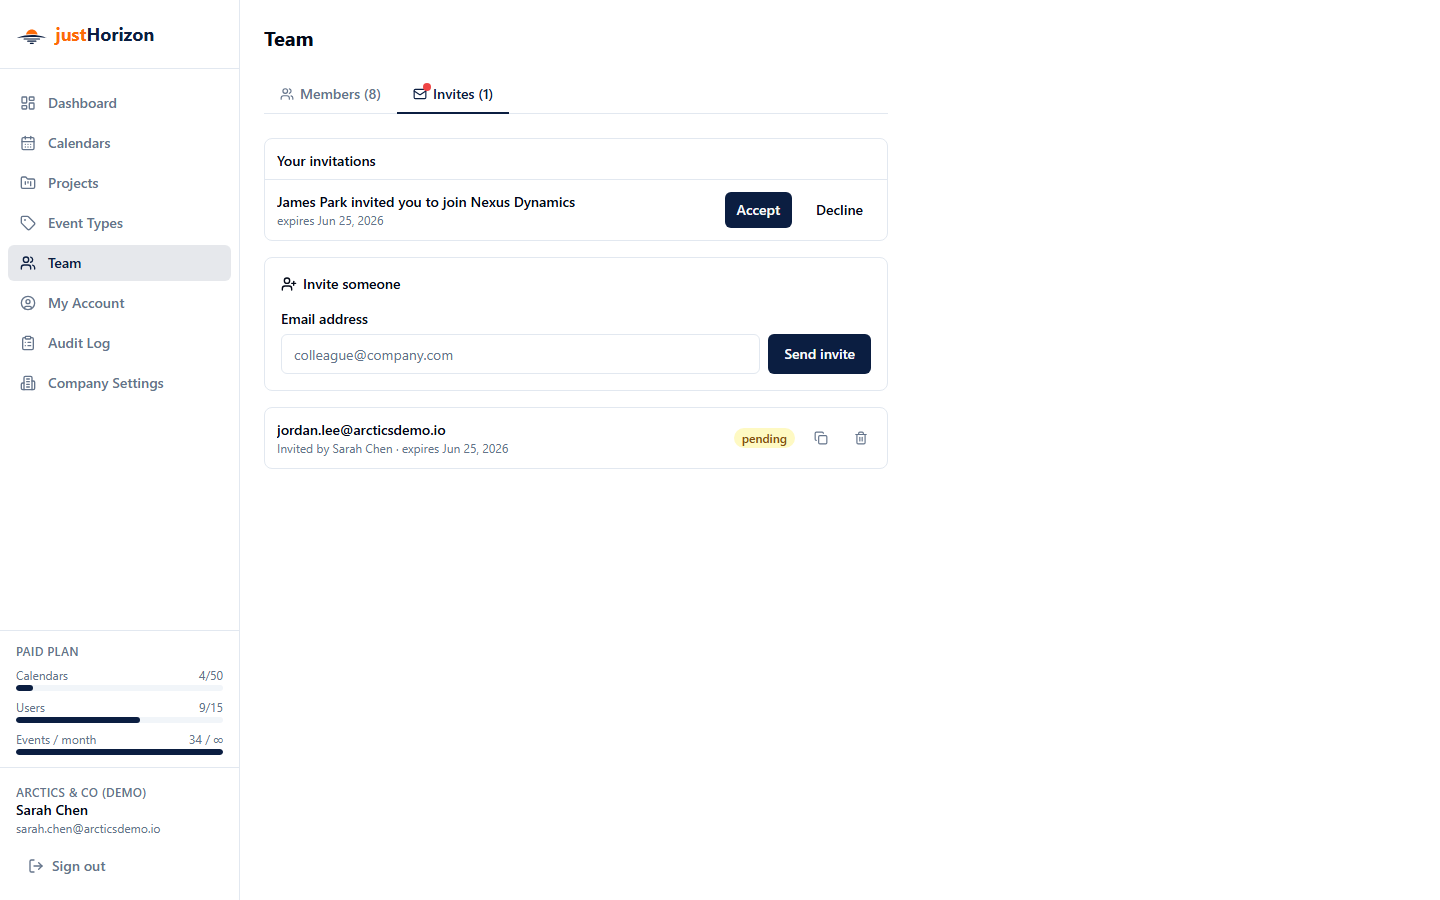
If you receive an invite:
- No existing account: click the link and register.
- Existing account: you can accept in two ways:
- Visit the invite link directly while logged in — the page shows Join / Decline buttons if your logged-in email matches the invite.
- Or log in, then go to the Team page. The "Your invitations" card shows all pending invites from other companies with the same Accept / Decline buttons.
A dismissible banner on the dashboard also notifies you of pending invitations.
Calendar member permissions
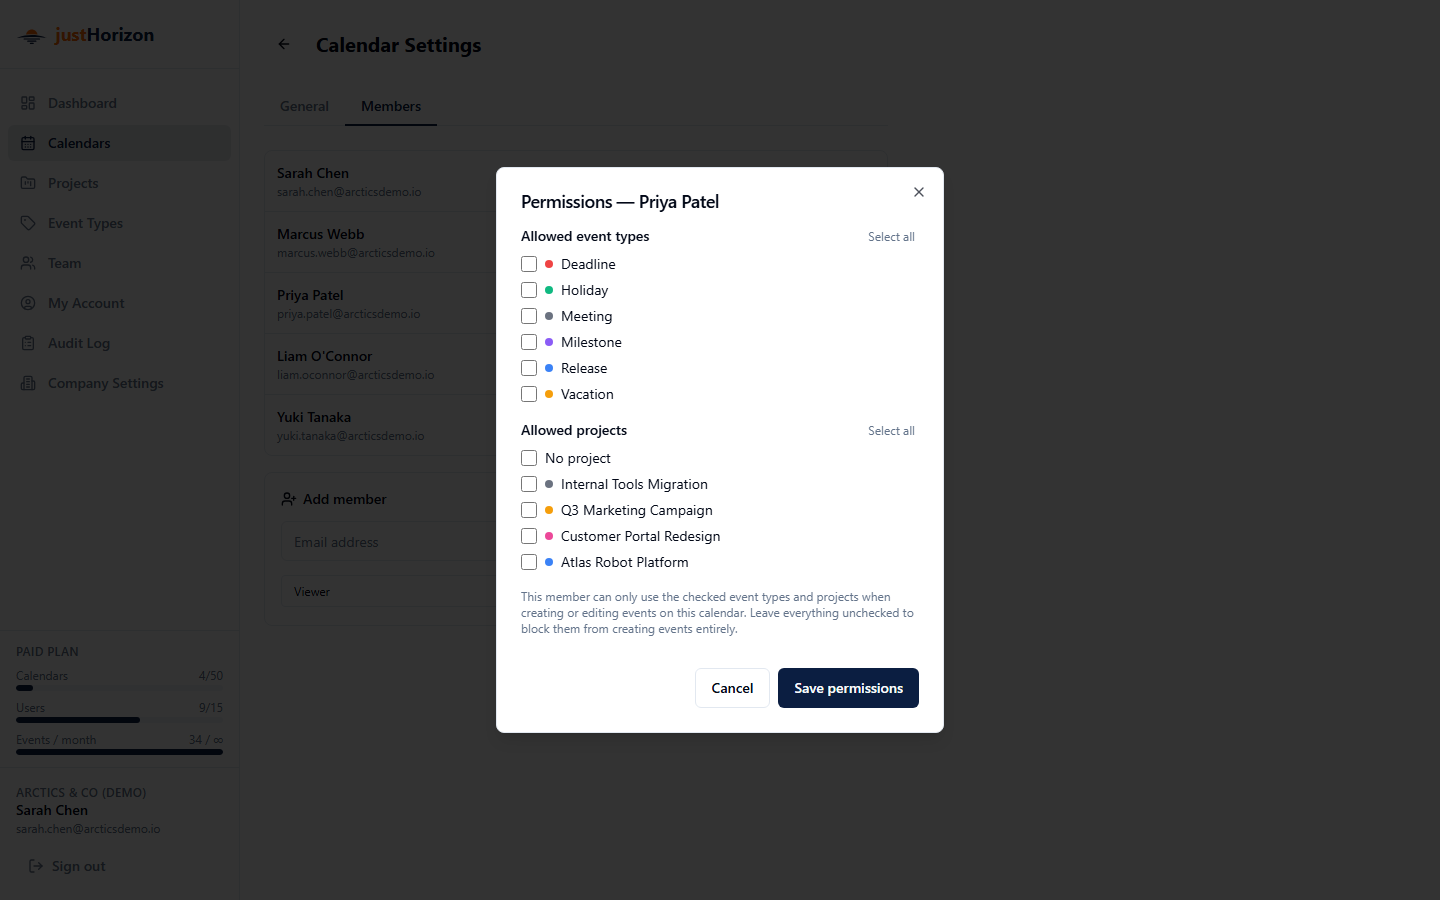
A calendar admin can restrict which projects and event types each editor/viewer member is allowed to use when creating or editing events.
Permissions can be set when a member is first added or updated at any time later. Go to Calendar Settings → Members and click the permissions button (shown as "N types · M projects") next to any editor or viewer's name to open the permissions dialog and grant:
- At least one event type — required; without this they cannot create any event.
- At least one project option — either specific projects, "no project" (events with no project attached), or both. Without any project option, they still cannot create events even if event types are granted.
Permissions are managed in Calendar Settings → Members.
9. Shared Calendar Links
Company admins can share a read-only, public view of a calendar without requiring the viewer to log in.
Creating a shared link
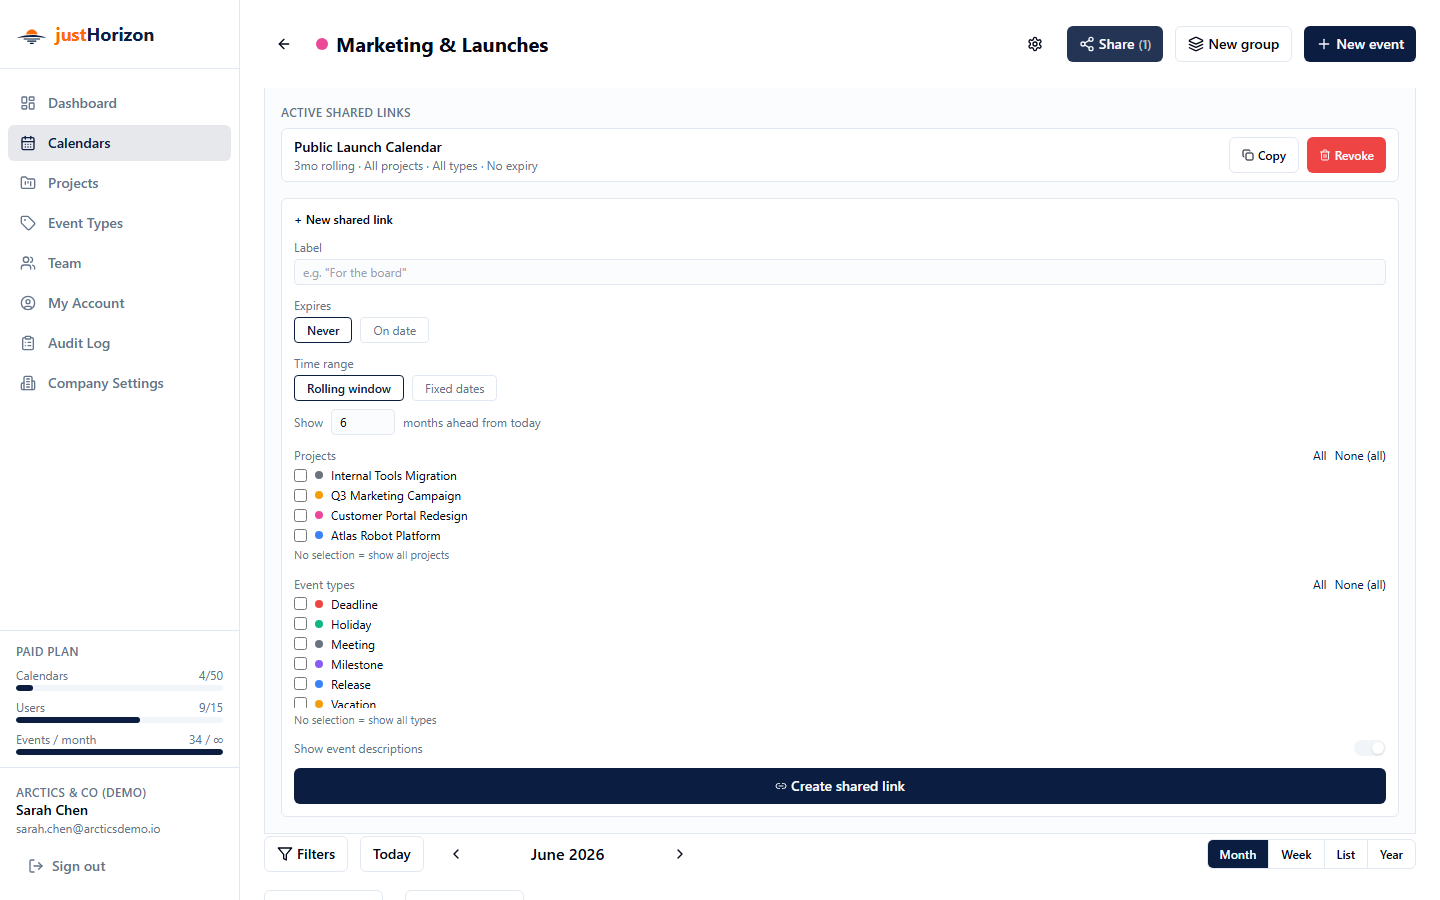
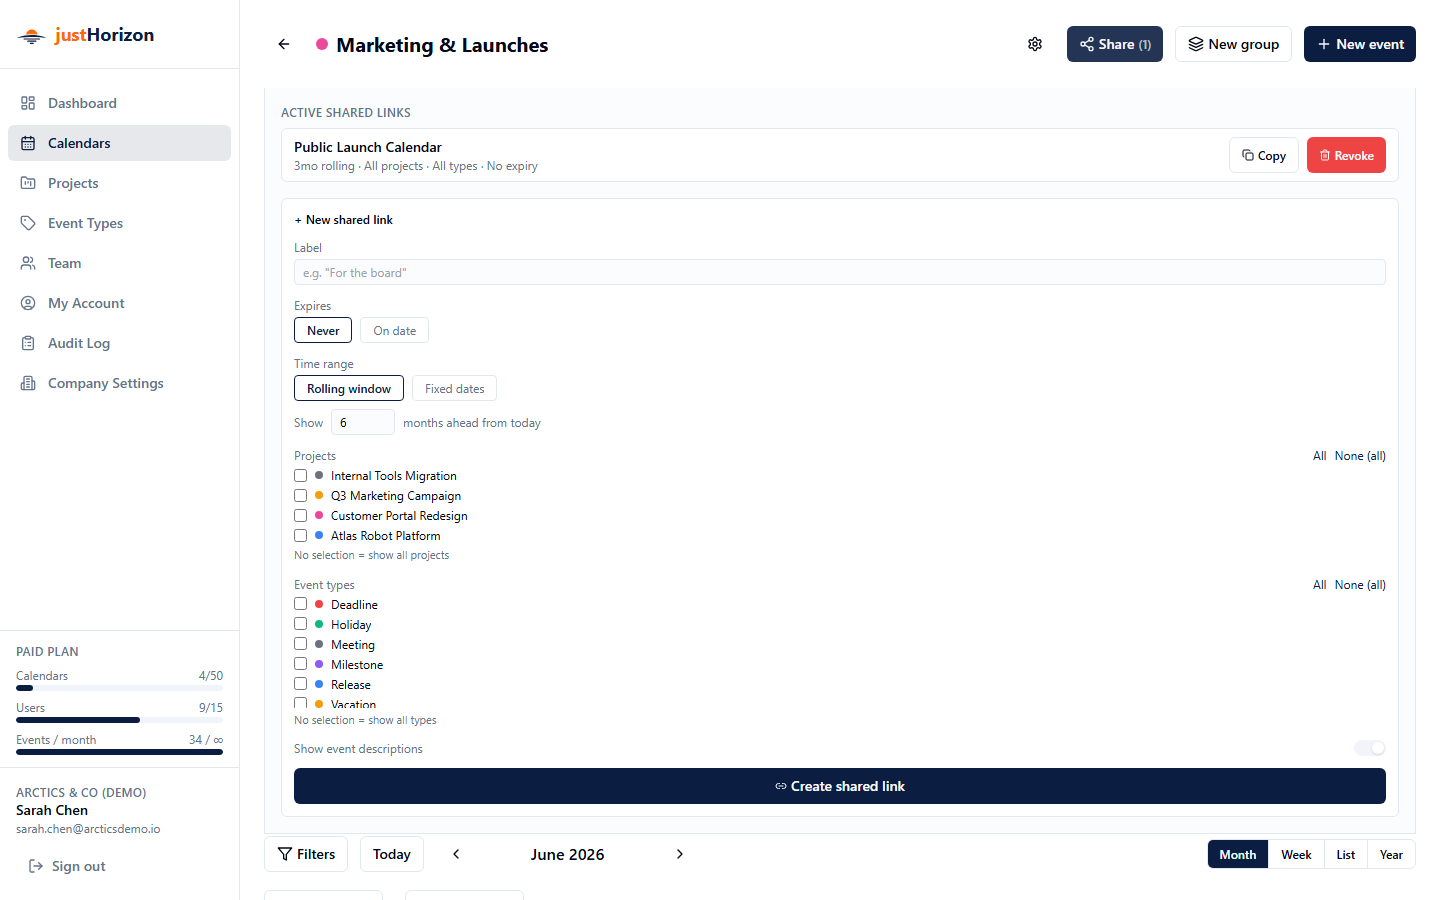
Open the calendar, click the Share button in the header (visible to company admins only), then click New shared link. Configure:
| Option | Description |
|---|---|
| Label | Descriptive name for the link |
| Date range | Fixed dates or rolling window (e.g. next 3 months) |
| Event types | Filter — show only selected types (leave blank for all) |
| Projects | Filter — show only selected projects (leave blank for all) |
| Show descriptions | Whether to include event description text |
| Expiry | When the link stops working |
The public link (/share/:token)
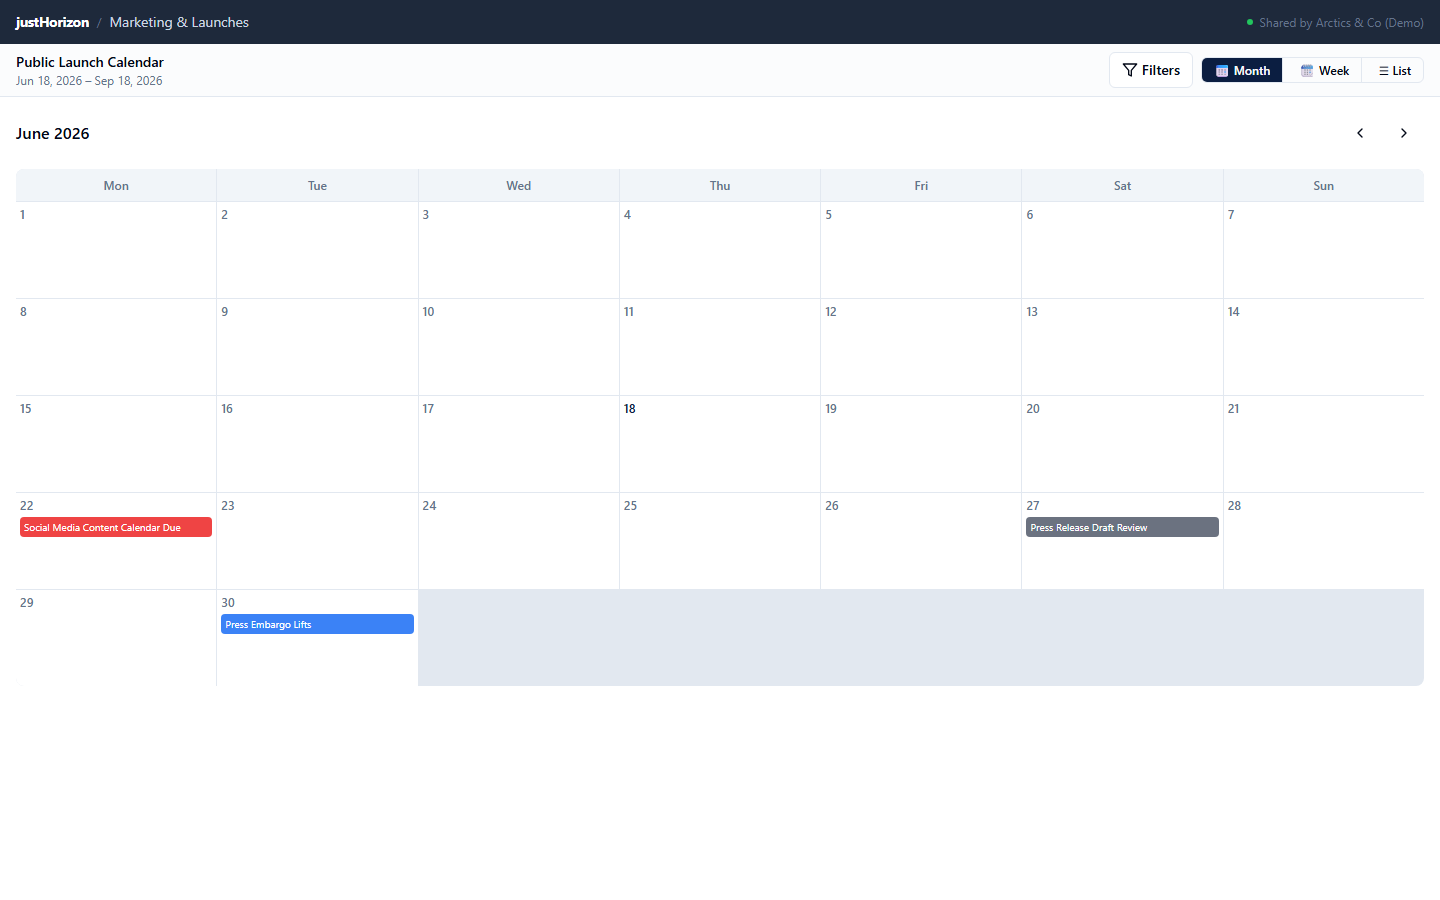
Recipients open the link in any browser — no login required. They can:
- Toggle between Month, Week, and List views using the buttons at the top right.
- Filter events by event type and project using the Filters sidebar.
- Click any event in Month or Week view to see a detail popup with date, project, and description.
- In List view, events are already shown with full details inline — no click required.
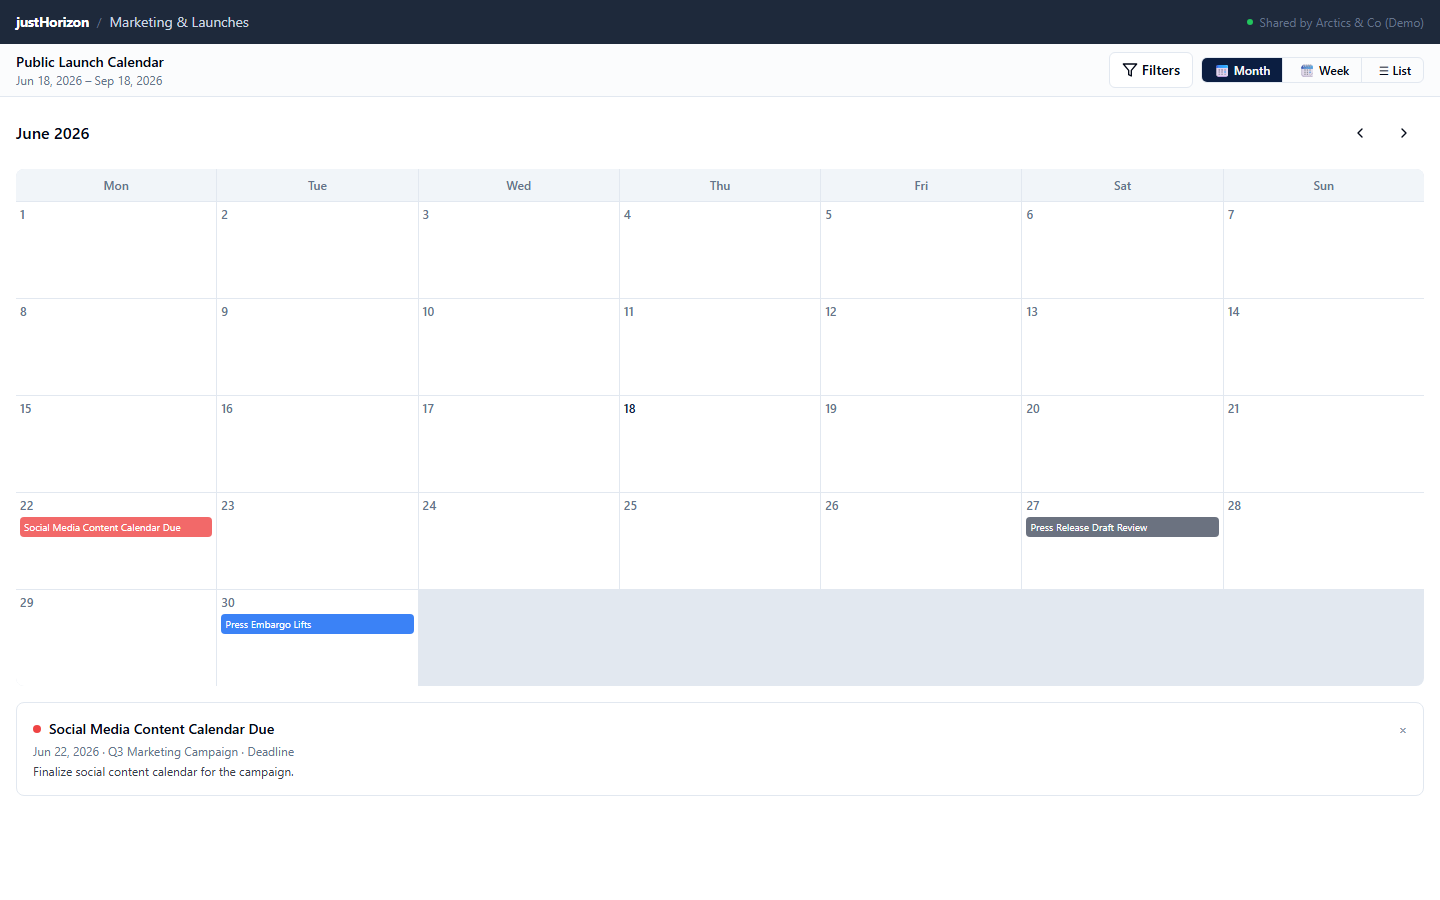
Filters on the public page persist in the browser's local storage per link.
Revoking a link
Open the calendar, click Share, find the link, and click Revoke. The link immediately stops working.
Expired or invalid links
If a recipient opens a link that has expired or been revoked, they see an error page — not a blank calendar. They should contact the company admin to get a fresh link.
10. Calendar Visibility Filters
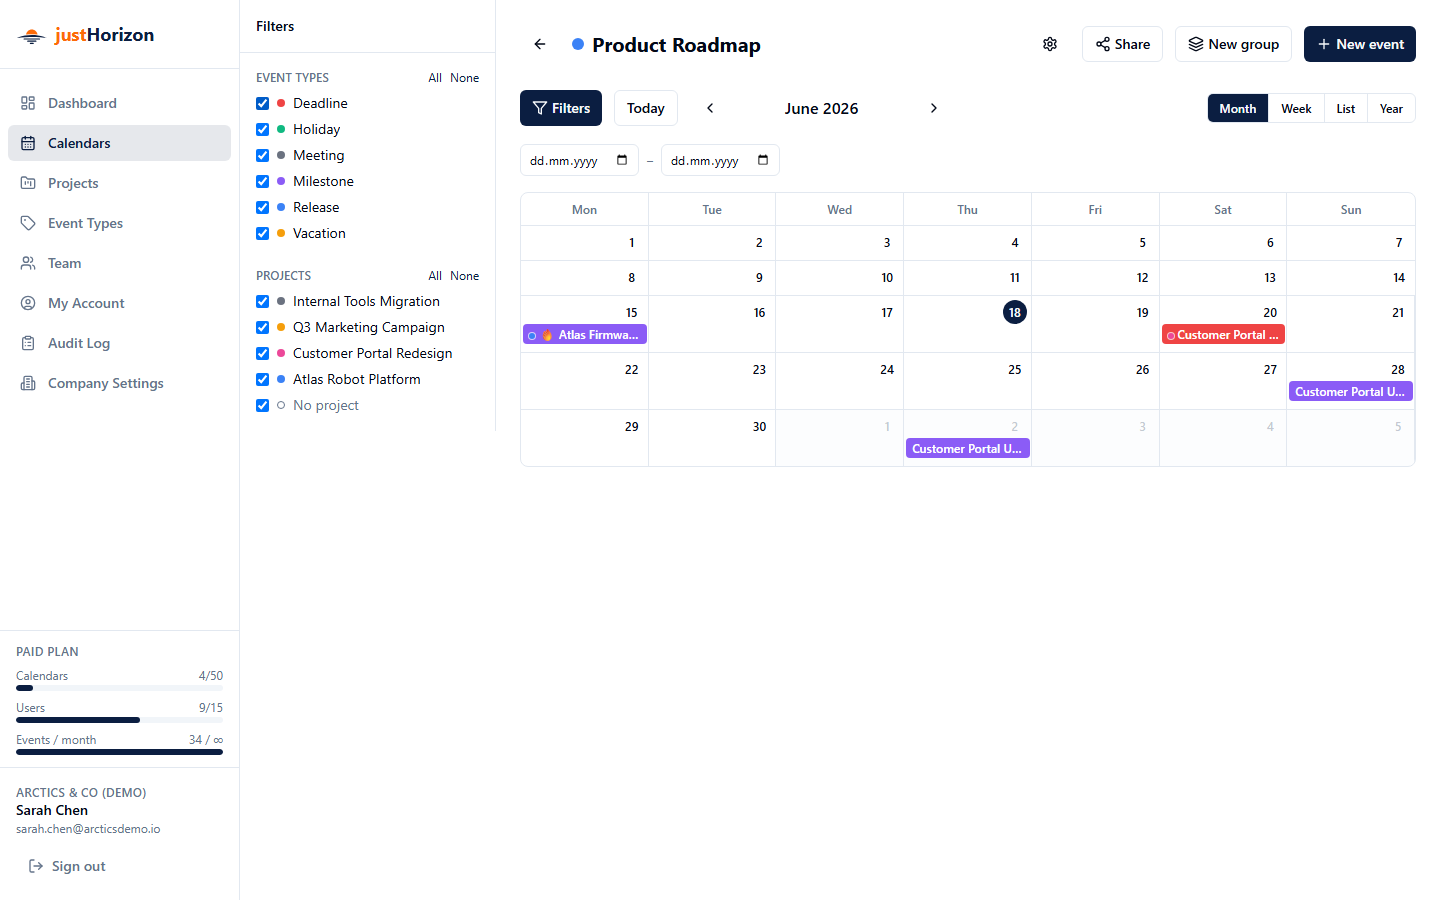
Inside a calendar, click the Filters button (funnel icon) in the header to open a sidebar with toggles for:
- Event types — check/uncheck types to show or hide their events.
- Projects — check/uncheck projects; a separate "No project" toggle controls events with no project.
Each section has an All / None link to quickly toggle everything at once.
A badge on the Filters button shows how many items are currently hidden so you always know if a filter is active.
Filters are saved per-calendar in your browser's local storage and restored on your next visit.
11. My Account
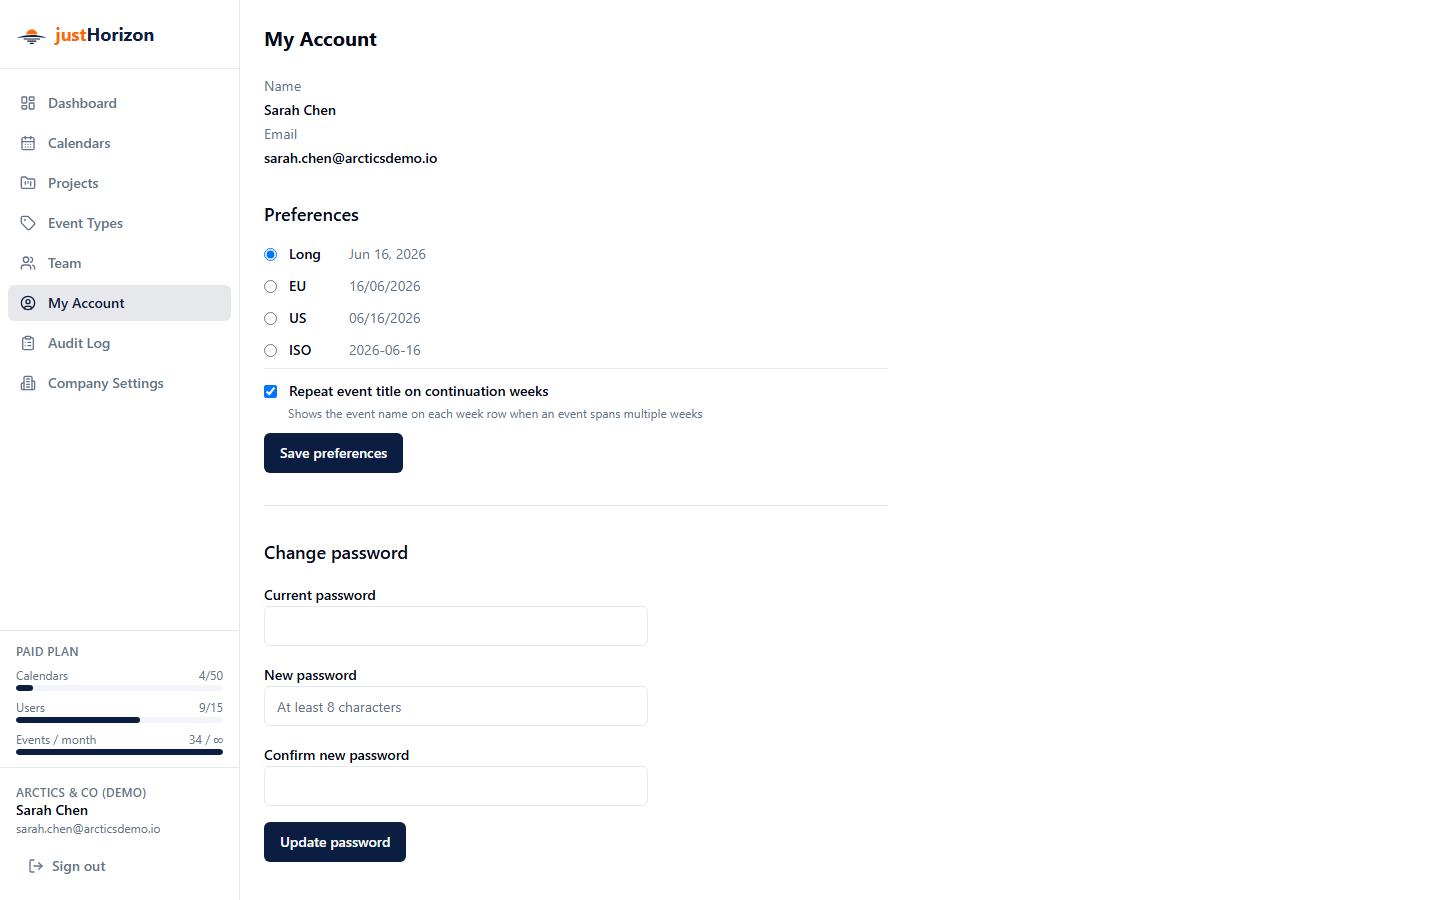
Click My Account in the sidebar to access account settings (/account).
Your name and email are read-only and cannot be changed from within the app.
Preferences
Date format
Choose how dates appear throughout the app:
| Format | Example |
|---|---|
| Long (default) | Jun 16, 2026 |
| European | 16/06/2026 |
| US | 06/16/2026 |
| ISO | 2026-06-16 |
Repeat event title on continuation weeks
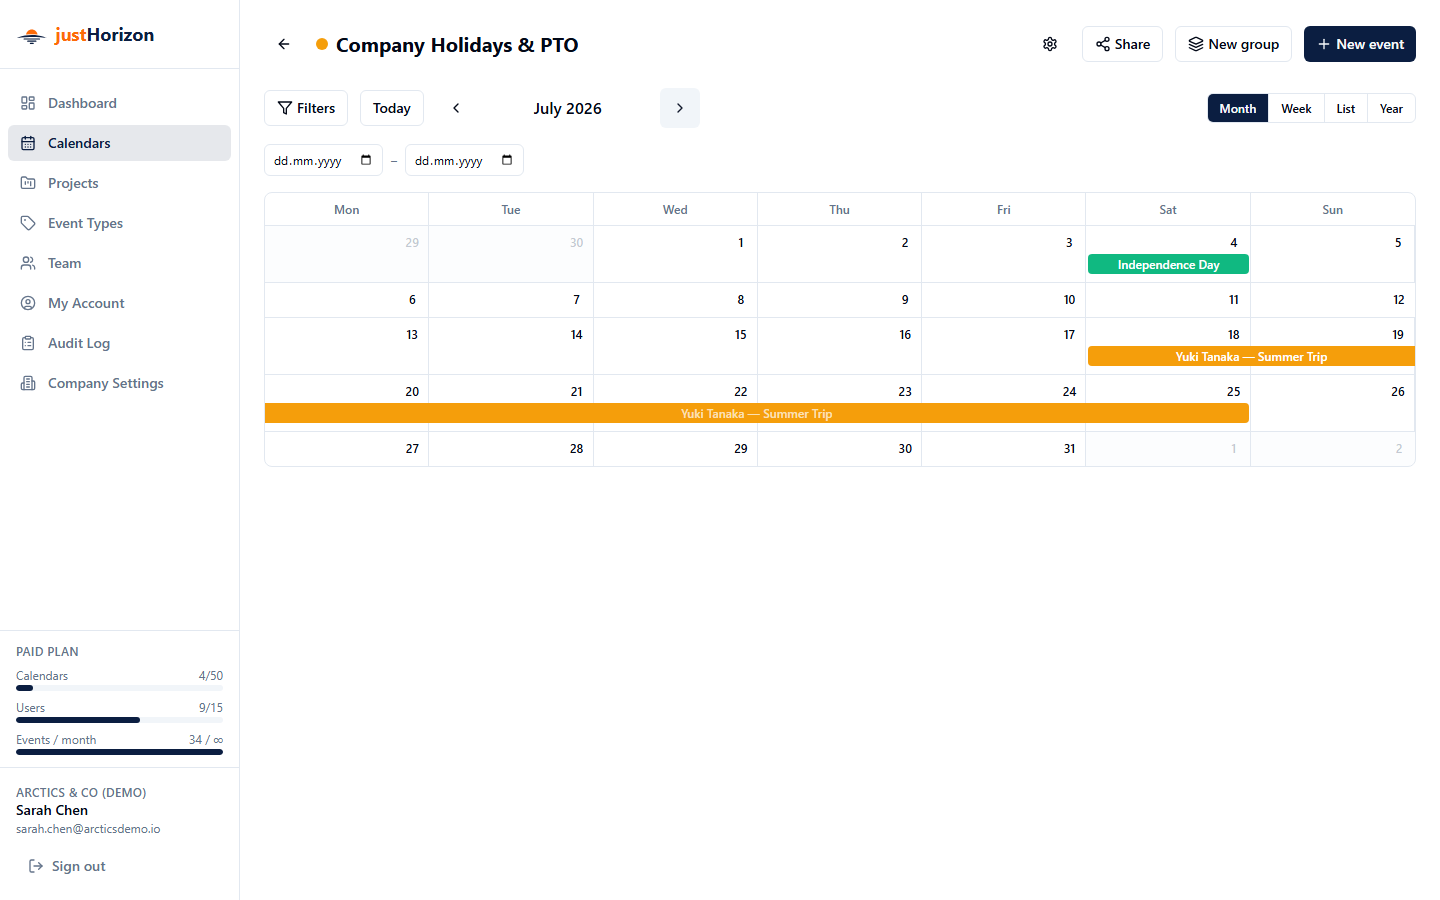
When enabled (default), multi-week events show the event title on every week row of the monthly calendar. Continuation rows are shown at reduced opacity to distinguish them from the start row. Disable this for a cleaner look on calendars with many long events.
Change or set a password
- If you signed up with email/password: enter your current password and a new one (8–72 characters).
- If you signed in with Google/Microsoft only: set a password directly (no current password required); this adds email/password as an additional login method.
12. Company Settings
Accessible to Company Admins only via the sidebar → Company Settings.
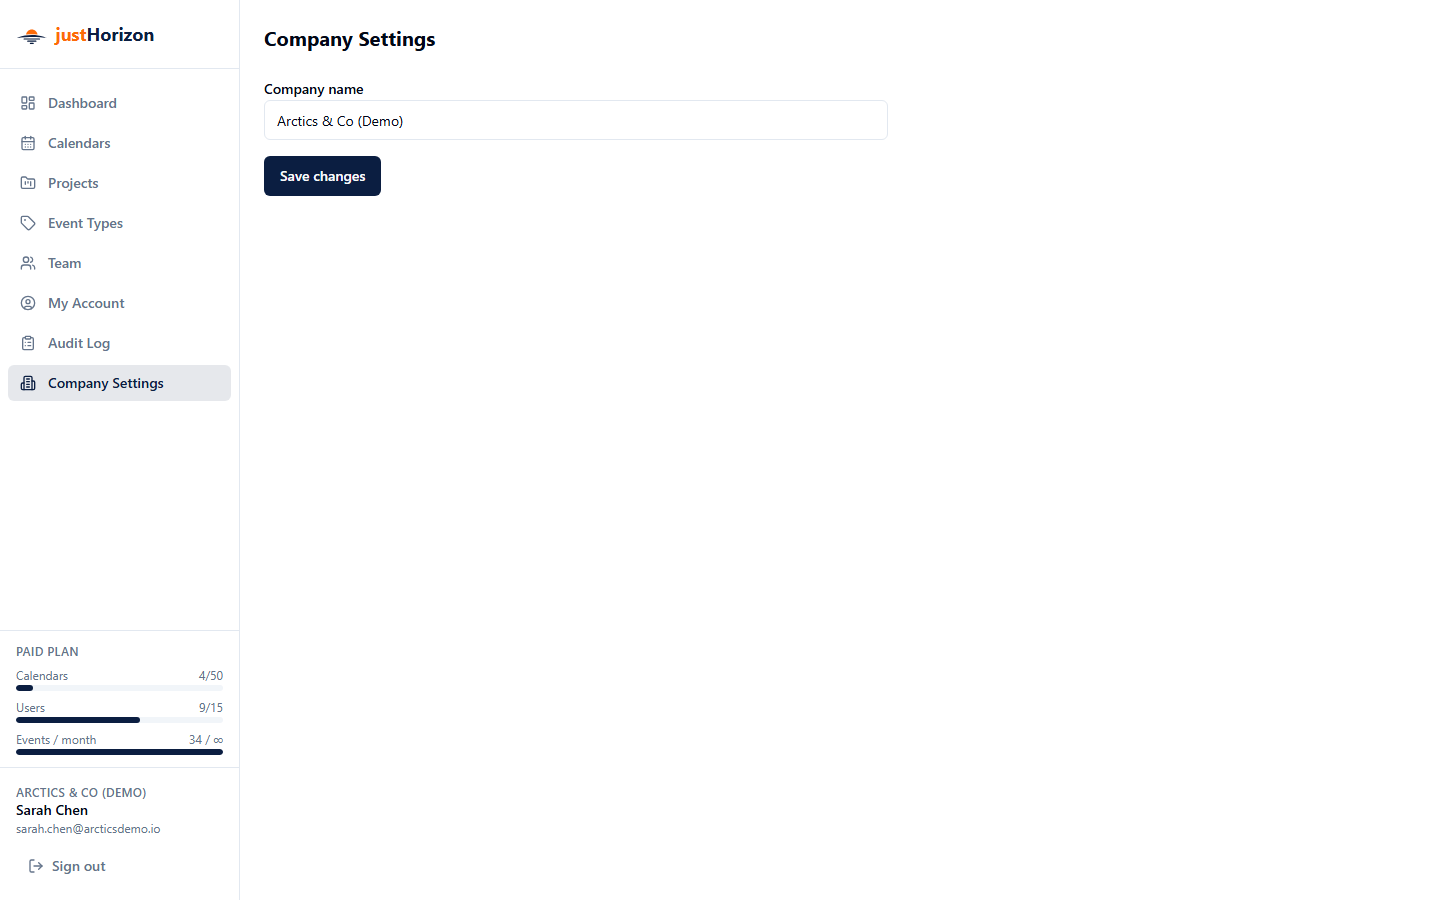
Company name
Update your company's display name. The name appears in the sidebar for all users.
13. Audit Log
Accessible to Company Admins only via the sidebar → Audit Log.
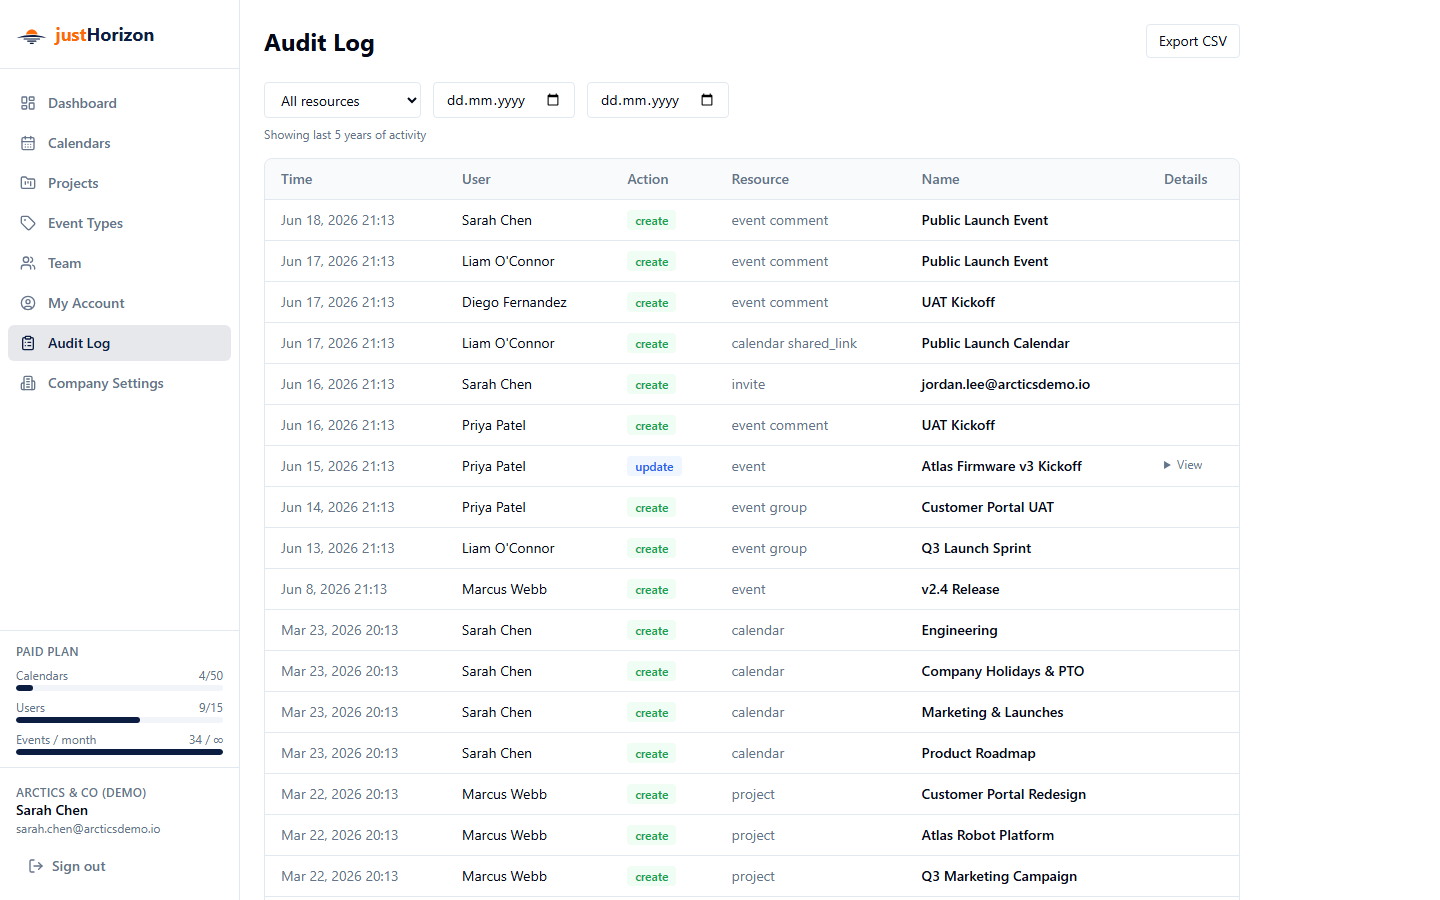
The audit log records every create, update, and delete action performed in your workspace — who did it, what resource was affected, and the before/after field values for updates.
Browsing the log
- Use the Resource type filter to narrow down to a specific area (events, calendars, projects, etc.).
- Use Start date / End date to limit the date range.
- Results are paginated (50 per page). Use the Previous / Next buttons to navigate.
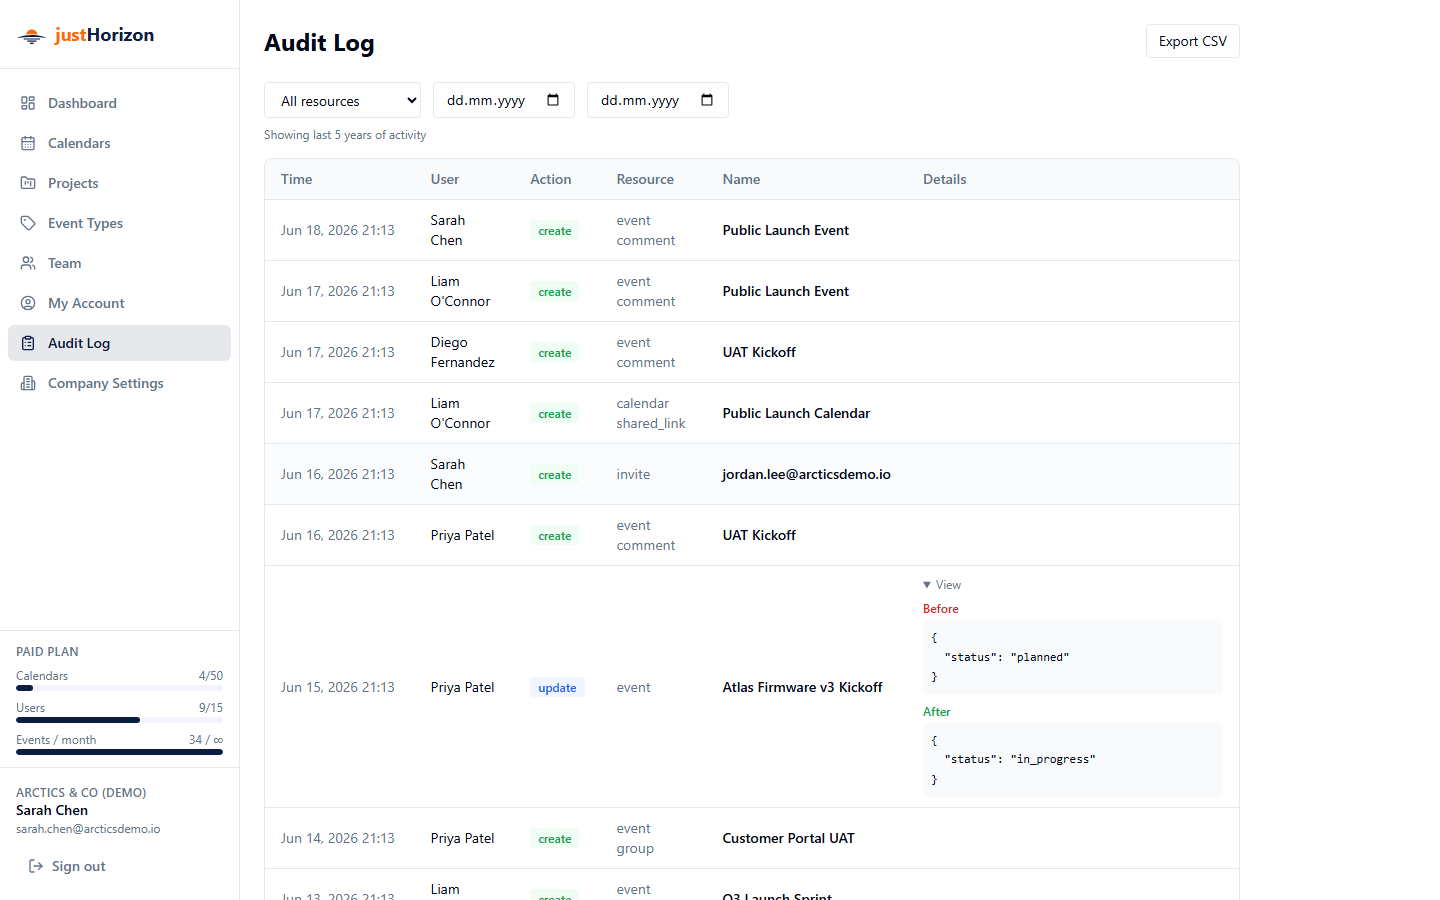
Rows that record a field change show a View link in the Details column. Click it to expand the full before/after JSON snapshot of the changed fields. Rows for create and delete actions have no details to expand.
Retention
| Plan | Retention |
|---|---|
| Free | 7 days |
| Paid | 5 years (1825 days) |
A notice at the top of the page shows your plan's retention window. Queries outside the window are blocked.
Exporting to CSV
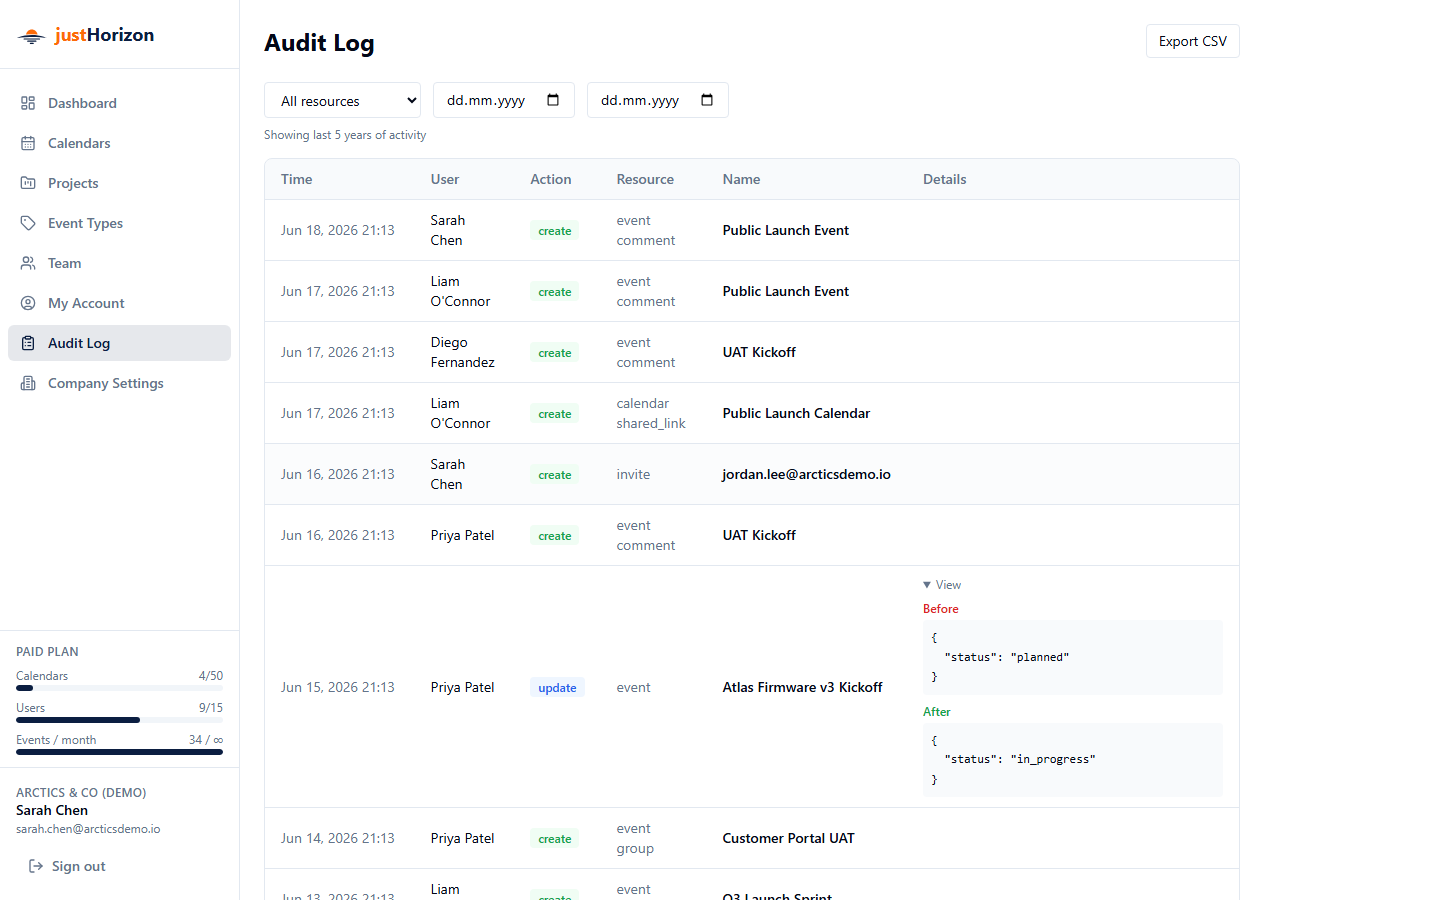
Click Export CSV to download the current filtered results as a spreadsheet. This button is available on paid plans only. The export applies the same date and resource-type filters as the current view.